Author

Lena Blaze

Browsing

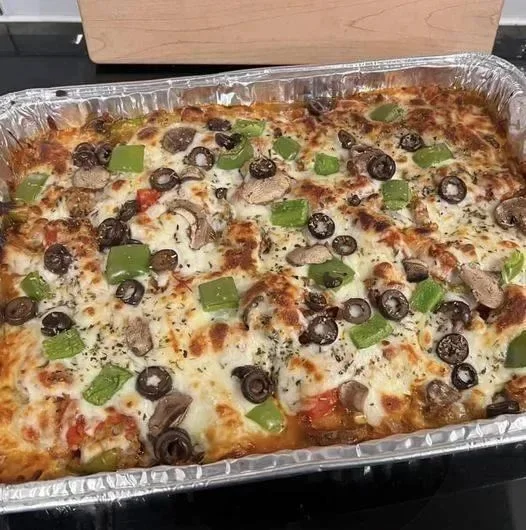
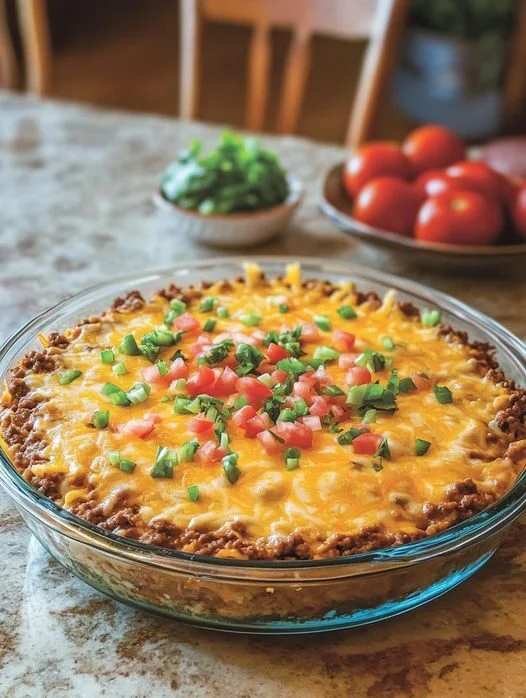
Introduction: Welcome to a culinary adventure where the flavors of pizza meet the convenience of a casserole in our WW Homemade Crustless Pizza Bake recipe. Whether you’re following a wellness journey or simply seeking a delicious twist on a classic favorite, this dish promises to satisfy your cravings while keeping your wellness goals in check. Join us as we explore the art of crafting this delectable pizza-inspired bake that’s perfect for busy weeknights or casual gatherings.

Ingredients:

  • 1 lb lean ground turkey or chicken
  • 1 small onion, finely chopped
  • 2 cloves garlic, minced
  • 1 cup sliced mushrooms
  • 1 bell pepper, diced
  • 1 cup cherry tomatoes, halved
  • 1/4 cup sliced black olives
  • 1/2 cup pizza sauce
  • 1 cup shredded part-skim mozzarella cheese
  • 1/4 cup grated Parmesan cheese
  • 1 tablespoon Italian seasoning
  • Salt and pepper to taste
  • Cooking spray

Instructions:

  1. Preheat your oven to 375°F (190°C). Lightly coat a 9×13 inch baking dish with cooking spray and set aside.
  2. In a large skillet over medium heat, cook the lean ground turkey or chicken until browned and cooked through, breaking it up with a spoon as it cooks.
  3. Add the chopped onion and minced garlic to the skillet with the cooked ground meat. Cook for an additional 2-3 minutes, or until the onion is translucent and fragrant.
  4. Stir in the sliced mushrooms and diced bell pepper, and cook for another 2-3 minutes, or until the vegetables are tender.
  5. Add the halved cherry tomatoes and sliced black olives to the skillet, and cook for another minute, just until heated through.
  6. Spread the pizza sauce evenly over the bottom of the prepared baking dish.
  7. Transfer the cooked meat and vegetable mixture to the baking dish, spreading it out evenly over the sauce.
  8. Sprinkle the shredded part-skim mozzarella cheese and grated Parmesan cheese evenly over the top of the meat and vegetable mixture.
  9. Season the pizza bake with Italian seasoning, salt, and pepper to taste.
  10. Bake in the preheated oven for 20-25 minutes, or until the cheese is melted and bubbly, and the edges are golden brown.
  11. Once baked, remove the pizza bake from the oven and let it cool for a few minutes before slicing and serving.

Nutritional Information:

  • Serving Size: 1/6 of the pizza bake
  • Calories: 250
  • Total Fat: 10g
  • Saturated Fat: 4g
  • Trans Fat: 0g
  • Cholesterol: 60mg
  • Sodium: 500mg
  • Total Carbohydrates: 10g
  • Dietary Fiber: 2g
  • Sugars: 4g
  • Protein: 30g

Smart WW Points: 6 points per serving

Conclusion: Congratulations! You’ve just discovered the recipe for a guilt-free indulgence – WW Homemade Crustless Pizza Bake. With its savory blend of lean protein, vibrant vegetables, and gooey cheese, this pizza-inspired bake is a wholesome twist on a beloved classic. Whether enjoyed as a satisfying weeknight meal or shared with loved ones at a gathering, this dish is sure to impress with its delicious flavors and nutritious ingredients. So go ahead, slice into a piece of culinary perfection and savor the taste of homemade goodness with every bite!

Weight watchers GRILLED CHICKEN SALAD

Ingredients:

For the Salad:

4 boneless, skinless chicken breasts (approximately 6 ounces each)

8 cups mixed salad greens (such as romaine, arugula, and spinach)

1 cup cherry tomatoes, halved

1 cucumber, sliced

1 red onion, thinly sliced

1 bell pepper, color of your choice, sliced

1/4 cup reduced-fat feta cheese, crumbled

Salt and pepper to taste

For the Dressing:

3 tablespoons extra virgin olive oil

2 tablespoons balsamic vinegar

1 teaspoon Dijon mustard

1 garlic clove, minced

Salt and pepper to taste

Instructions:

Prep the Chicken: Season the chicken breasts with salt and pepper. Preheat your grill or grill pan over medium-high heat. Grill the chicken for 6-7 minutes per side or until fully cooked (internal temperature should reach 165°F). Let it rest for a few minutes before slicing.

Make the Salad: In a large salad bowl, combine the mixed greens, cherry tomatoes, cucumber, red onion, bell pepper, and feta cheese.

Prepare the Dressing: In a small bowl, whisk together the olive oil, balsamic vinegar, Dijon mustard, minced garlic, salt, and pepper until emulsified.

Assemble the Salad: Add the sliced grilled chicken to the salad. Drizzle with the dressing and toss gently to combine. Adjust seasoning if necessary.

Serve: Divide the salad among plates. Enjoy immediately for the best flavor and texture.

Nutritional Facts (per serving):

Calories: Approximately 350

Fat: 15g

Carbohydrates: 12g

Fiber: 3g

Protein: 40g

WW Points: This salad can range from 0 to 4 points on the WW Blue and Purple plans, depending on the use of oil and cheese. For the Green plan, points mainly come from the chicken.

 Tuna Cutlets

 Tuna Cutlets

Ingredients
2 cans of tuna, drained
1/4 cup almond flour
1/4 cup grated Parmesan cheese
1/4 cup mayonnaise
1 large egg
2 tablespoons chopped fresh parsley
1 teaspoon Dijon mustard
1/2 teaspoon garlic powder
1/2 teaspoon onion powder
Salt and pepper to taste
2-3 tablespoons cooking oil (like olive oil or avocado oil)
Instructions:
In a mixing bowl, combine the drained tuna, almond flour, grated Parmesan cheese, mayonnaise, egg, chopped parsley, Dijon mustard, garlic powder, onion powder, salt, and pepper. Mix well until all the ingredients are evenly combined.
Form the mixture into patties or cutlets. The size is up to you, but aim for around 4-6 cutlets.
Heat the cooking oil in a skillet over medium heat.
Carefully place the tuna cutlets in the skillet and cook for about 3-4 minutes on each side, or until they are golden brown and cooked through.
Once cooked, remove the cutlets from the skillet and place them on a plate lined with paper towels to absorb any excess oil.
Serve the keto tuna cutlets with your choice of side dishes, such as a fresh salad, steamed vegetables, or cauliflower rice.
Enjoy your delicious and nutritious keto meal!
Nutritional

Calories: Around 250-300 calories per serving
Protein: Around 20-25 grams per serving
Fat: Around 15-20 grams per serving
Carbohydrates: Around 4-6 grams of net carbs per serving (total carbs minus fiber)
Fiber: Around 1-2 grams per serving 

Elevate your keto dining experience with our tantalizing WW Tuna Cutlets recipe. Bursting with savory flavors and wholesome ingredients, these cutlets are a delicious and nutritious option for those seeking a low-carb, high-protein meal. Whether enjoyed as a satisfying lunch or a flavorful dinner, these cutlets are sure to become a staple in your keto recipe collection.

Ingredients:

  • 2 cans of tuna, drained: Packed with protein and omega-3 fatty acids, tuna serves as the nutritious base of these cutlets, offering a savory and satisfying flavor profile.
  • 1/4 cup almond flour: Almond flour adds a delicate texture to the cutlets while keeping them low in carbs, making it an ideal choice for keto-friendly cooking.
  • 1/4 cup grated Parmesan cheese: Parmesan cheese lends a rich and nutty flavor to the cutlets, enhancing their overall taste and texture.
  • 1/4 cup mayonnaise: Creamy and indulgent, mayonnaise helps bind the ingredients together while adding moisture and richness to the cutlets.
  • 1 large egg: Acting as a binding agent, the egg helps hold the cutlets together, ensuring a cohesive texture.
  • 2 tablespoons chopped fresh parsley: Fresh parsley adds a burst of color and freshness to the cutlets, elevating their visual appeal and flavor profile.
  • 1 teaspoon Dijon mustard: Dijon mustard infuses the cutlets with a subtle tanginess and depth of flavor, complementing the other ingredients beautifully.
  • 1/2 teaspoon garlic powder and 1/2 teaspoon onion powder: These aromatic spices add depth and complexity to the cutlets, enhancing their savory taste.
  • Salt and pepper to taste: Seasoned to perfection, salt and pepper bring out the natural flavors of the ingredients, ensuring a well-balanced dish.
  • 2-3 tablespoons cooking oil (such as olive oil or avocado oil): Cooking oil is used to pan-fry the cutlets, creating a crispy and golden exterior while keeping them tender and moist on the inside.

Instructions:

  1. Prepare the Tuna Mixture: In a mixing bowl, combine the drained tuna, almond flour, grated Parmesan cheese, mayonnaise, egg, chopped parsley, Dijon mustard, garlic powder, onion powder, salt, and pepper. Mix well until all the ingredients are evenly combined, forming a cohesive mixture.
  2. Shape the Cutlets: Using your hands, form the tuna mixture into patties or cutlets of your desired size. Aim for around 4-6 cutlets, ensuring they are evenly shaped for even cooking.
  3. Heat the Cooking Oil: In a skillet, heat the cooking oil over medium heat until shimmering. This ensures that the cutlets achieve a crispy and golden brown exterior during cooking.
  4. Cook the Cutlets: Carefully place the tuna cutlets in the skillet and cook for approximately 3-4 minutes on each side, or until they are golden brown and cooked through. Be gentle when flipping the cutlets to prevent them from breaking apart.
  5. Drain and Serve: Once cooked, remove the cutlets from the skillet and place them on a plate lined with paper towels to absorb any excess oil. This step helps ensure that the cutlets are crispy and delicious.
  6. Serve and Enjoy: Serve the keto tuna cutlets with your choice of side dishes, such as a fresh salad, steamed vegetables, or cauliflower rice. Garnish with additional parsley or a squeeze of lemon juice for added flavor, and enjoy your delicious and nutritious keto meal!

Nutritional Information:

  • Calories: Each serving of Keto Tuna Cutlets provides around 250-300 calories, making it a satisfying and wholesome meal option.
  • Protein: With approximately 20-25 grams of protein per serving, these cutlets are a protein-packed dish that helps support muscle growth and repair.
  • Fat: Offering around 15-20 grams of fat per serving, these cutlets provide a good source of healthy fats, which are essential for energy and satiety on a keto diet.
  • Carbohydrates: With only around 4-6 grams of net carbs per serving (total carbs minus fiber), these cutlets are a low-carb option that fits well within a ketogenic eating plan.
  • Fiber: Providing around 1-2 grams of fiber per serving, these cutlets offer a modest amount of dietary fiber, promoting digestive health and helping you feel full and satisfied after your meal.

Conclusion:

In conclusion, our WW Tuna Cutlets recipe offers a delicious and nutritious way to enjoy a flavorful meal while staying true to your WW lifestyle. Packed with protein, healthy fats, and wholesome ingredients, these cutlets are a satisfying option for anyone seeking a low-carb, high-protein dish. Whether served as a main course or enjoyed as a convenient meal prep option, these cutlets are sure to please your taste buds and nourish your body with every bite. Add this recipe to your repertoire and savor the deliciousness of WW-friendly dining today!

Weight Watchers-Friendly Homemade Chicken and Broccoli Casserole

Introduction

Looking for a hearty, satisfying, and nutritious dish that’s low in Weight Watchers (WW) points but still packed with flavor? This Homemade Keto Chicken and Broccoli Casserole is the ideal meal to satisfy your cravings while staying within your WW points. It’s a comforting, creamy, and cheesy casserole that incorporates lean chicken, nutrient-dense broccoli, and a deliciously creamy base—all made to fit your weight loss goals.

This recipe has been reimagined to align with the WW program, with a focus on minimizing points while maximizing flavor. The creamy sauce is made without the usual high-calorie ingredients, keeping the points low but the taste rich and satisfying. Whether you’re meal prepping for the week or looking for a wholesome family dinner, this WW-friendly keto chicken and broccoli casserole is perfect for any occasion.

Let’s dive into the details and see how you can create this guilt-free, satisfying dish that will keep you on track with your WW goals.


Why This Keto Chicken and Broccoli Casserole Is Perfect for Weight Watchers

For those following Weight Watchers, finding recipes that are low in points without sacrificing flavor is key. This casserole fits perfectly into your WW meal plan for several reasons:

  • Low in SmartPoints: By using ingredients like chicken breast, broccoli, and reduced-fat cheese, this casserole remains low in SmartPoints. The creamy base is lightened up with Greek yogurt and light cream cheese, making it satisfying without piling on extra points.
  • Packed with Protein: Chicken breast is an excellent source of lean protein, which helps you stay full longer. The addition of protein helps control hunger, making it a great meal for those working to lose weight.
  • High in Nutrients: Broccoli is rich in vitamins, fiber, and antioxidants. It’s a low-calorie vegetable that adds crunch and nutrients to your casserole.
  • Customizable: You can easily adjust the flavors by adding different seasonings, using different cheeses, or incorporating additional vegetables based on what you like.

Let’s take a deeper look at how to prepare this dish, step-by-step, while keeping the points low and the flavor high.


Ingredients for Weight Watchers-Friendly Keto Chicken and Broccoli Casserole

To make this casserole low in WW points but rich in flavor, we’ll focus on healthy, wholesome ingredients that won’t compromise your progress. Here’s what you’ll need:

Main Ingredients:

  • 2 cups cooked chicken breast (shredded or cubed, preferably skinless)
  • 3 cups broccoli florets (fresh or frozen)
  • 1 cup reduced-fat shredded cheddar cheese (light cheddar cheese to keep points low)
  • 1/2 cup non-fat Greek yogurt (for creaminess without adding extra fat)
  • 1/4 cup light cream cheese (for richness, but keeping the points in check)
  • 1/2 cup chicken broth (low-sodium)
  • 1/4 cup grated Parmesan cheese (optional, for extra flavor)
  • 1 teaspoon garlic powder (or 2 minced garlic cloves)
  • 1 teaspoon onion powder
  • 1/2 teaspoon black pepper
  • 1/4 teaspoon salt (adjust to taste)
  • 1 teaspoon Dijon mustard (optional, adds depth of flavor)
  • 1/2 teaspoon dried thyme (optional, adds herby aroma)

Optional Toppings:

  • Fresh parsley (for garnish)
  • Extra Parmesan cheese (for topping, optional but adds a lovely finishing touch)

Step-by-Step Instructions for Making the WW-Friendly Keto Chicken and Broccoli Casserole

Step 1: Prepare the Chicken

Start by cooking the chicken breast. If you have pre-cooked chicken on hand (perhaps from meal prep), that’s even better! If not, you can easily cook the chicken by seasoning it with salt, pepper, and your favorite spices. Bake it at 375°F for 25–30 minutes, or until it reaches an internal temperature of 165°F. Once cooked, shred or chop the chicken into bite-sized pieces.

If you’re using rotisserie chicken, make sure to remove the skin and any visible fat to keep the points low.

Step 2: Cook the Broccoli

If using fresh broccoli, wash and cut it into florets. You can steam it or cook it in a pot of boiling water for 2-3 minutes until tender but still firm. Drain it well to remove any excess water, as this will help the casserole retain its creamy texture. If using frozen broccoli, simply thaw and drain it well.

Step 3: Prepare the Creamy Sauce

In a medium saucepan, combine non-fat Greek yogurtlight cream cheese, and chicken broth. Heat the mixture over medium heat, whisking until the ingredients are well combined and smooth. Once it starts to simmer, stir in the garlic powderonion powderblack pepper, and salt. If you like a little tang, you can also add 1 teaspoon Dijon mustard for extra depth of flavor.

Once the sauce is fully combined and creamy, stir in the shredded cheddar cheese and Parmesan cheese (if using), and allow the cheese to melt into the sauce, creating a creamy, cheesy base.

Step 4: Combine the Chicken, Broccoli, and Sauce

In a large mixing bowl, combine the shredded chicken and cooked broccoli. Pour the creamy sauce over the chicken and broccoli, stirring to coat everything evenly. Make sure all the broccoli is well covered with the sauce and that the chicken is evenly distributed.

Step 5: Assemble the Casserole

Transfer the chicken, broccoli, and sauce mixture into a greased 9×9-inch casserole dish (or similar sized dish). Spread the mixture out evenly and press it down lightly to ensure everything is compacted and set.

Step 6: Bake the Casserole

Preheat your oven to 375°F (190°C). Place the casserole dish into the oven and bake for 20–25 minutes, or until the casserole is bubbly and the top is lightly golden. If you want an extra crispy topping, you can sprinkle some additional shredded Parmesan cheese on top during the last 5 minutes of baking.

Step 7: Garnish and Serve

Once the casserole is done, remove it from the oven and allow it to cool for a few minutes before serving. Garnish with fresh parsley if desired, and serve hot!


Nutritional Information (Per Serving)

This recipe yields about 6 servings, and the following nutritional values are approximate:

  • Calories: 215 kcal
  • Fat: 11g
    • Saturated Fat: 5g
  • Carbohydrates: 7g
    • Fiber: 2g
    • Net Carbs: 5g
  • Protein: 27g
  • Sugar: 3g
  • Sodium: 320mg
  • WW SmartPoints: 6 (per serving)

These points are based on the use of low-fat ingredients and non-fat Greek yogurt. If you choose to use full-fat versions, the points could be slightly higher.


Additional Tips for Making This Recipe

  1. Make it Gluten-Free: This recipe is naturally gluten-free, but always double-check ingredient labels to ensure they don’t contain hidden gluten.
  2. Add More Veggies: For added nutrition and volume, consider adding other vegetables like bell peppers, spinach, or mushrooms. Just be mindful of the points if you use high-carb veggies.
  3. Low-Carb Crunch: To make it more like a traditional casserole with a topping, consider using a small amount of crushed pork rinds or a sprinkle of almond flour mixed with melted butter as a low-carb substitute for breadcrumbs.
  4. Meal Prep Friendly: This casserole can be made ahead of time. Simply prepare it up to the point of baking, cover it tightly, and store it in the refrigerator for up to 2 days. When ready to serve, simply bake it as instructed.
  5. Add Spice: For a bit of heat, add some red pepper flakes or a dash of cayenne pepper to the sauce. It will give the casserole a little kick.

Conclusion

This Weight Watchers-Friendly Keto Chicken and Broccoli Casserole is an ideal recipe for anyone following a WW plan and looking for a delicious, filling, and nutritious meal. With lean protein from chicken, fiber from broccoli, and a rich, creamy sauce that keeps the points low, it’s a great choice for any meal. Whether you’re feeding a family or meal prepping for the week, this casserole is sure to become a staple in your recipe rotation.

By making smart ingredient choices and keeping portion sizes in check, you can enjoy this keto-inspired dish without worrying about your points or your waistline. So, if you’re looking for a healthy, satisfying, and low-point dinner, give this casserole a try—you’ll be glad you did!

Enjoy this recipe as part of your WW journey, and don’t hesitate to make it your own by adjusting the seasonings or adding more of your favorite low-carb ingredients!

california-spaghetti-salad

Introduction: Embark on a culinary journey with our California Spaghetti Salad, a symphony of vibrant colors and tantalizing flavors that perfectly blend the freshness of vegetables with the satisfying comfort of spaghetti. This versatile dish is not only visually appealing but also a celebration of wholesome ingredients, offering a delightful twist on the classic pasta salad. Whether you’re hosting a summer soirée or seeking a refreshing lunch option, our California Spaghetti Salad is sure to be a crowd-pleaser.

The Artful Assembly: Begin by preparing 8 ounces of spaghetti, cooking it to perfection and allowing it to cool. In a spacious mixing bowl, combine the cooled spaghetti with an array of fresh and crisp vegetables, including cherry tomatoes, diced cucumber, a mix of colorful bell peppers, sliced black olives, finely chopped red onion, and a generous handful of fresh parsley. The combination of textures and colors creates an enticing canvas for a delicious culinary masterpiece.

Optional Enhancements: Elevate the flavor profile by incorporating optional ingredients such as crumbled feta cheese for a creamy tanginess and sunflower seeds or pine nuts for a delightful crunch. These additions not only contribute to the complexity of flavors but also enhance the overall texture of the salad.

The Elegance of Dressing: Craft a harmonious dressing by whisking together extra-virgin olive oil, red wine vinegar, Dijon mustard, honey, minced garlic, salt, and black pepper in a small bowl or jar. This dressing acts as the magical elixir that ties the diverse elements of the salad together. The combination of acidity from the vinegar, the subtle sweetness of honey, and the richness of olive oil creates a dressing that is both vibrant and satisfying.

Tossing with Precision: Pour the meticulously crafted dressing over the pasta and vegetables, ensuring that every element is generously coated. Employ a gentle tossing technique to maintain the integrity of the spaghetti and the freshness of the vegetables while allowing the flavors to intermingle harmoniously.

Chill and Let Flavor Unfold: Refrigerate the California Spaghetti Salad for at least 1-2 hours before serving. This step is crucial, as it allows the flavors to meld and intensify, creating a dish that is not only visually appealing but also bursting with a medley of tastes.

The Finishing Touch: Before serving, give the salad a final toss, ensuring that the flavors are evenly distributed. Adjust the seasoning if necessary, ensuring that each bite is a perfect balance of savory, sweet, and refreshing notes.

Conclusion: Present this California Spaghetti Salad as a testament to the artistry of combining fresh, quality ingredients in a way that is both visually stunning and utterly delectable. Whether served as a side dish or the star of the meal, this salad captures the essence of California’s vibrant culinary landscape. Perfect for warm days or any occasion, this salad is a celebration of flavors that will leave your guests craving more. Dive into the experience, savor the freshness, and relish in the culinary masterpiece that is our California Spaghetti Salad.

California Spaghetti Salad

California Spaghetti Salad

Ingredients:

For the Salad:

  • 8 ounces spaghetti, cooked and cooled
  • 1 cup cherry tomatoes, halved
  • 1 cup cucumber, diced
  • 1 cup bell peppers (mix of colors), diced
  • 1/2 cup black olives, sliced
  • 1/4 cup red onion, finely chopped
  • 1/4 cup fresh parsley, chopped
  • 1/2 cup feta cheese, crumbled (optional)
  • 1/4 cup sunflower seeds or pine nuts (optional)

For the Dressing:

  • 1/3 cup extra-virgin olive oil
  • 3 tablespoons red wine vinegar
  • 1 teaspoon Dijon mustard
  • 1 teaspoon honey
  • 1 clove garlic, minced
  • Salt and black pepper to taste

Instructions:

  1. In a large mixing bowl, combine the cooked and cooled spaghetti with cherry tomatoes, cucumber, bell peppers, black olives, red onion, and fresh parsley.
  2. In a small bowl or jar, whisk together the olive oil, red wine vinegar, Dijon mustard, honey, minced garlic, salt, and black pepper. Adjust the seasonings to taste.
  3. Pour the dressing over the pasta and vegetables. Toss everything together until well coated.
  4. If using, sprinkle crumbled feta cheese and sunflower seeds or pine nuts over the top of the salad.
  5. Refrigerate the California Spaghetti Salad for at least 1-2 hours before serving to allow the flavors to meld.
  6. Before serving, toss the salad again and adjust the seasoning if necessary.
  7. Serve chilled and enjoy this refreshing and flavorful California Spaghetti Salad!

Discover the joy of turning a simple head of cauliflower into a crispy, golden delight with this easy-to-follow recipe. Perfect as a healthy snack, a savory side dish, or a tasty appetizer, this crispy oven-baked cauliflower is sure to impress with its delicious flavor and satisfying crunch. If you find yourself loving this recipe, don’t hesitate to share your thoughts in the comments!

Ingredients:

1 head of cauliflower

Salt, to taste

A pinch of nutmeg

For the Batter:

50g wheat flour

A dash of sweet paprika powder

2 eggs

40g butter, melted

2 cloves garlic, minced

A bit of grated nutmeg

A pinch of salt

Preparation:

Prep the Cauliflower:
Rinse the cauliflower head thoroughly under cold water.

Carefully break it down into florets.

In a large pot of boiling water seasoned with salt and a pinch of nutmeg, cook the cauliflower florets until al dente. This should take about 5-7 minutes.

Remove the florets with a slotted spoon and let them steam dry or pat dry with a kitchen towel to remove excess moisture.

Prepare the Batter:

In a mixing bowl, whisk together the eggs and melted butter until frothy.

Add in the minced garlic, salt, paprika, a touch of nutmeg, and gradually sift in the wheat flour. Stir everything together until you achieve a smooth, consistent batter.

Coat the Cauliflower:

Once the cauliflower florets have cooled slightly and are manageable to touch, dip and roll them in the prepared batter. Make sure each floret is evenly coated.

Bake:

Preheat your oven to 190°C (375°F) with the setting on both upper and lower heat.

Arrange the batter-coated cauliflower florets on a greased baking tray, ensuring they are spaced out evenly.

Bake in the preheated oven on the middle rack for about 20 minutes, or until the florets are golden brown and crispy.

Serve:

Once done, remove the tray from the oven and let the cauliflower cool for a few minutes before serving. This allows the florets to crisp up even further.

Enjoy your crispy oven-baked cauliflower as is, or pair it with your favorite dipping sauce for an extra flavor kick. Whether you’re serving this to guests, enjoying it as a nutritious snack, or adding it as a side to your main meal, this cauliflower recipe is a delicious way to incorporate more veggies into your diet. Don’t forget to share your experience and any personal twists you added to the recipe in the comments below

Introduction

If you’re craving a comforting, flavorful, and filling meal that fits perfectly within your Weight Watchers (WW) program, look no further than this Weight Watchers Tuna Melt. This healthy, low-smart point take on the classic tuna melt is the perfect balance of protein-packed tuna, gooey melted cheese, and crispy bread—without the guilt. By using lighter ingredients, this recipe offers all the classic flavors you love, without the excess calories or points.

Tuna melts are a popular choice for quick, easy, and satisfying meals, especially when you’re short on time. Whether you’re making it for lunch, a light dinner, or even a snack, this dish can be easily customized to suit your preferences. It’s high in protein, low in carbs, and packed with healthy fats, making it a great choice for anyone looking to stay on track with their WW goals.

In this guide, we’ll break down the ingredients, step-by-step instructions, and useful tips for preparing the perfect Weight Watchers Tuna Melts that will taste just as good, if not better, than the original. Let’s dive into this wholesome, guilt-free recipe that’s perfect for a quick weeknight meal or a satisfying lunch!


Ingredients

To make the Weight Watchers Tuna Melts, you’ll need a few key ingredients. These are lighter options that keep the meal both delicious and WW-friendly.

  • 1 can (5 oz) light tuna in water, drained – Tuna is the star of this recipe. Opt for light tuna in water rather than oil-packed tuna to cut down on calories and fat. Tuna is high in protein and omega-3 fatty acids, making it an excellent choice for a healthy meal.
  • 1 tablespoon reduced-fat mayonnaise – To bind the tuna and add creaminess, use reduced-fat mayonnaise or opt for a Greek yogurt substitute if you prefer. Both options provide a creamy texture without adding excessive calories or SmartPoints.
  • 1 tablespoon Dijon mustard – Dijon mustard adds a subtle tanginess that complements the tuna’s flavor and balances the creaminess of the mayo.
  • 1 tablespoon lemon juice – A squeeze of fresh lemon juice adds a citrusy zing that brightens up the flavor of the tuna mixture.
  • 1/4 cup chopped celery – Celery adds a satisfying crunch and freshness to the tuna melt. It also brings some added fiber to the dish, which is always a plus.
  • 1/4 cup red onion, finely chopped – Red onion adds a mild sweetness and a little bite, enhancing the overall flavor profile of the tuna filling.
  • 1 teaspoon garlic powder – Garlic powder elevates the tuna salad with a savory depth that complements the other flavors.
  • 1/2 teaspoon dried dill – Dill is a classic herb often paired with tuna, adding a light, aromatic flavor that’s perfect for this melt.
  • 1 slice whole grain bread – For the bread, choose whole grain bread or light sandwich bread to keep the SmartPoints low while adding fiber and texture.
  • 1 slice reduced-fat Swiss cheese or cheddar – Choose a reduced-fat cheese like Swiss or cheddar to melt on top of the tuna for that signature gooey cheese layer. These cheese options have fewer calories and SmartPoints than their full-fat counterparts.
  • 1 teaspoon olive oil or cooking spray – For grilling the bread, a light coating of olive oil or non-stick cooking spray is enough to crisp up the bread without adding too many calories.
  • Optional toppings: Sliced tomatoes, fresh herbs, or additional seasoning like black pepper or red pepper flakes to taste.


Instructions

Here’s how you can make these Weight Watchers Tuna Melts from start to finish, ensuring a perfect result every time. The process is simple and quick, making it an ideal meal for busy days when you want something satisfying and healthy.

  1. Prepare the Tuna Salad:
    Start by draining the tuna thoroughly to remove any excess water. This will ensure that your tuna salad isn’t too watery. Transfer the tuna to a medium-sized mixing bowl and use a fork to break it up into smaller chunks.
  2. Mix the Tuna Filling:
    To the tuna, add the reduced-fat mayonnaiseDijon mustard, and lemon juice. Stir everything together until it’s well combined. The mustard and lemon juice help to brighten the flavor of the tuna and cut through the richness of the mayo.
  3. Add the Crunch and Flavor:
    Stir in the chopped celeryred oniongarlic powder, and dried dill. These ingredients not only add texture and flavor, but they also provide extra fiber, which is beneficial for digestion and helps you feel full longer.
  4. Toast the Bread:
    Heat a non-stick skillet or griddle over medium heat. While the pan heats up, place the whole grain bread in the pan. Lightly toast it on both sides until golden brown and crispy. If you want extra crispiness, you can brush the bread with a small amount of olive oil before toasting. This step helps create a sturdy base that holds up to the melted cheese and tuna filling.
  5. Assemble the Tuna Melt:
    Once the bread is toasted, spread a generous amount of the prepared tuna filling on top of one side of the bread. Make sure to evenly distribute the tuna mixture for an even melt.
  6. Top with Cheese:
    Place a slice of reduced-fat Swiss cheese or cheddar over the tuna. The cheese will melt perfectly over the warm tuna, creating that signature, gooey tuna melt experience. If you like extra cheese, you can add a second slice, but be mindful of the additional SmartPoints.
  7. Grill the Sandwich:
    Carefully place the assembled sandwich back onto the skillet and cook it on medium-low heat for about 3-4 minutes on each side. Press gently on the sandwich with a spatula to help the cheese melt evenly. Be careful not to burn the bread, as you want a golden, crispy texture without overcooking.
  8. Serve and Garnish:
    Once both sides are golden and the cheese is melted, remove the sandwich from the pan and place it on a cutting board. Slice it in half and serve immediately. For an extra burst of freshness, top with sliced tomatoes or sprinkle a little fresh black pepper and herbs like parsley or basil.

Additional Tips for the Perfect Tuna Melt

  1. Use a Quality Bread: The bread is a key component of the tuna melt. To keep the SmartPoints low, choose a light whole grain bread or sprouted grain bread, which is high in fiber and lower in calories. You can also opt for a low-carb wrap if you’re aiming for fewer carbs.
  2. Make It Your Own: Customize the tuna mixture with your favorite ingredients. You could add a bit of pickles or olives for extra flavor, or swap the celery for chopped apples for a hint of sweetness.
  3. Cheese Variations: While Swiss and cheddar are traditional options, you can experiment with other reduced-fat cheeses like mozzarella or provolone for a different flavor profile.
  4. Add Veggies: If you’re looking to increase your vegetable intake, consider adding some sautéed spinach, roasted red peppers, or even zucchini slices into your tuna filling before assembling the sandwich. It will add extra fiber and nutrients.
  5. Healthy Cooking Techniques: If you prefer to keep the bread crispy without using butter or oil, you can use a non-stick cooking spray to lightly coat the bread before toasting it. This will cut back on calories while still providing a crisp, golden exterior.

Nutritional Information (Per Serving)

This Weight Watchers Tuna Melt recipe serves one sandwich, and here’s the breakdown of the nutritional information per serving:

  • Calories: 320 kcal
  • Fat: 12g
  • Protein: 28g
  • Carbohydrates: 28g
  • Fiber: 6g
  • Net Carbs: 22g
  • Sugar: 4g

WW SmartPoints (Based on Plan)

  • Blue Plan: 5 SmartPoints
  • Green Plan: 5 SmartPoints
  • Purple Plan: 4 SmartPoints

This recipe is designed to be WW-friendly, making it easy to stay within your daily points. It’s high in protein, which will help keep you feeling full, and low in SmartPoints, making it an ideal option for lunch or dinner.


Conclusion

The Weight Watchers Tuna Melt is the perfect combination of comfort food and healthy eating. With its savory tuna salad, gooey cheese, and crispy bread, this recipe offers all the classic flavors of a tuna melt without the guilt. It’s easy to make, full of protein, and can be customized with various vegetables, cheeses, and bread options to suit your tastes and dietary preferences.

Whether you’re following the WW program or just trying to eat healthier, this tuna melt is a satisfying and delicious choice that’s sure to become a regular part of your meal rotation. So go ahead, indulge in this healthier take on the classic tuna melt, and enjoy a meal that’s both nutritious and full of flavor!

Creamy Cucumber Salad – WW (Weight Watchers)

Indulge in the crisp freshness of our Creamy Cucumber Salad, specially crafted for those following the Weight Watchers Freestyle program. Bursting with vibrant flavors and wholesome ingredients, this salad is a delightful addition to any meal, offering a light and satisfying option for those watching their calorie intake.

Ingredients:

2 cucumbers
1 small red onion
1/2 cup fat-free sour cream
1 tablespoon dill
1 clove garlic, minced
1 tablespoon white wine vinegar (or distilled white vinegar)
1 teaspoon sugar
1/4 teaspoon salt
Instructions:

Prepare the Cucumbers: Start by peeling and slicing the cucumbers. Place them in a mixing bowl, ready to be combined with the other ingredients.
Add Red Onion: Slice the red onion thinly and add it to the bowl with the cucumbers. The vibrant color and subtle crunch of the onion will complement the cool crispness of the cucumbers beautifully.
Prepare the Dressing: In a separate small bowl, combine the fat-free sour cream, minced garlic, chopped dill, white wine vinegar, sugar, and salt. Mix these ingredients together until they form a smooth and creamy dressing with a hint of tanginess.
Combine and Serve: Pour the creamy dressing over the cucumbers and red onion in the mixing bowl. Gently toss the ingredients together until the cucumbers and onion are evenly coated with the dressing. Ensure that every bite is infused with the delicious flavors of the dressing.
Chill and Enjoy: Refrigerate the salad for at least 30 minutes before serving to allow the flavors to meld together and the salad to chill. This step enhances the refreshing qualities of the salad, making it the perfect cool and crisp accompaniment to any meal.
Nutritional Information:

Serving Size: 1 cup
Calories: 52 kcal
Carbohydrates: 8 g
Protein: 2 g
Fat: 1 g
Saturated Fat: 0 g
Cholesterol: 1 mg
Sodium: 123 mg
Fiber: 1 g
Sugar: 4 g
Description:

Our Creamy Cucumber Salad is a delightful blend of fresh cucumbers, zesty red onion, and a creamy dressing infused with dill and garlic. This light and refreshing salad are perfect for those following the Weight Watchers Freestyle program, as it offers a low-calorie yet satisfying option packed with flavor and nutrients.

With its simple yet sophisticated flavor profile, this salad is ideal for serving as a side dish at summer barbecues, picnics, or family gatherings. It pairs beautifully with grilled meats, seafood, or even as a topping for sandwiches or wraps.

Not only is this salad delicious, but it’s also incredibly easy to prepare, making it a convenient option for busy weeknights or meal prep sessions. Plus, with its low calorie and Points value, you can enjoy it guilt-free as part of your balanced diet.

Elevate your dining experience with our Creamy Cucumber Salad – a refreshing and flavorful treat that’s sure to become a favorite in your recipe collection.
Creamy Cucumber Salad – WW (Weight Watchers) Freestyle

Ingredients

2 cucumbers
1 small red onion
1/2 cup fat-free sour cream
1 tablespoon dill
1 clove garlic, minced
1 tablespoon white wine vinegar (or distilled white vinegar)
1 teaspoon sugar
1/4 teaspoon salt
Instructions

Peel and slice the cucumbers. Add to a mixing bowl.
Slice the red onion and add it to the cucumbers.
In a small bowl add the sour cream, dill, garlic, vinegar, sugar and salt. Mix together, then add to the cucumbers. Stir together and serve!

Title: Ultimate Weight Watchers Crack Chicken: Three Ways to Savor the Ranch-Bacon-Cream Bliss

Introduction: Embark on a culinary journey with our Ultimate Weight Watchers Crack Chicken, a versatile and delectable dish that offers three delightful ways to enjoy the harmonious fusion of ranch, bacon, and cream. Whether relishing it as a dip, crowning your salad, or savoring it stuffed in mini bell peppers, this recipe is a celebration of flavor and creativity. Read on to discover how to effortlessly prepare this divine dish using your Instant Pot, slow cooker, or stovetop.

Equipment:

  • Instant Pot 6 qt
  • Sealing Rings
  • Olive Oil Spray

Ingredients:

  • 1 lb frozen chicken breast or thighs
  • 1 cup water
  • 4 slices turkey bacon
  • ¾ cup fat-free cottage cheese
  • ¼ cup fat-free Greek yogurt
  • 1 tsp garlic salt
  • 1 tsp onion powder
  • ½ tsp pepper
  • ½ tsp parsley
  • 1 tsp fresh dill (or ½ tsp dried)
  • ¼ cup fat-free cheddar cheese

Instructions:

Instant Pot Directions:

  1. Place frozen or thawed chicken in the Instant Pot, adding 1 cup of water. Cook on high pressure for 12 minutes, ensuring a natural release to maintain the chicken’s succulence.
  2. While the chicken cooks, oven-bake the turkey bacon until crispy, then cube it.
  3. Blend cottage cheese, Greek yogurt, garlic salt, onion powder, pepper, parsley, and dill into a ranch-like dressing. Set aside.
  4. Shred the cooked chicken and combine it with the dressing, turkey bacon, and cheddar cheese. Melt the cheese by using the Instant Pot’s sauté function if needed.

Slow Cooker Directions:

  1. Add 1 cup water or low-sodium chicken broth to the slow cooker, introducing the chicken. Cook on high for 4 hours.
  2. While the chicken cooks, oven-bake the bacon, then cube it.
  3. Blend cottage cheese, Greek yogurt, garlic salt, onion powder, pepper, parsley, and dill into a dressing.
  4. Pour the dressing over shredded chicken, adding turkey bacon and cheddar cheese. Optionally, return the mixture to the slow cooker to keep it warm.

Stovetop Directions:

  1. Bake, broil, or boil the chicken until fully cooked.
  2. Cook the bacon in the oven at 400 degrees for approximately 15 minutes, then cube it.
  3. Shred the cooked chicken and prepare the dressing by blending cottage cheese, Greek yogurt, garlic salt, onion powder, pepper, parsley, and dill.
  4. Combine the dressing with the shredded chicken, adding cooked bacon and cheddar cheese.

Nutritional Information: This Weight Watchers Crack Chicken boasts just 3 Points on the 2023 Plan, equating to 3 Blue Plan Points, 5 Green Plan Points, and 3 Purple Plan Points per serving. Opt for low-fat cottage cheese and fat-free Greek yogurt for the most accurate point calculation.

Conclusion: Indulge in the irresistible allure of our Ultimate Weight Watchers Crack Chicken, a culinary triumph that effortlessly adapts to your preferred cooking method. Whether you’re hosting a gathering, preparing a quick weeknight dinner, or exploring new appetizer ideas, this recipe is a testament to the fusion of health-conscious choices and sensational flavors. Delight in the endless possibilities this dish offers and make it a staple in your repertoire for guilt-free culinary adventures.

Weight Watchers Crack Chicken

Approximate Serving Size: 3/4 cup

SERVINGS 4

This Weight Watchers Crack Chicken Dip can be eaten three ways! Make it into a delicious dip, use it as a salad topping, or add it to mini bell peppers for a treat! This Ranch-Bacon-Cream Combo is going to be your new favorite meal!

Equipment
Instant Pot 6 qt
Sealing Rings
Olive Oil Spray
ingredients US Customary Metric
▢1 lb frozen chicken breast or thighs
▢1 cup water
▢4 slices turkey bacon
▢¾ cup cottage cheese fat free
▢¼ cup Greek yogurt fat free
▢1 tsp garlic salt
▢1 tsp onion powder
▢½ tsp pepper
▢½ tsp parsley
▢1 tsp fresh dill 1/2 tsp dried
▢¼ cup cheddar cheese fat free
Instructions
Instant Pot Directions:
Place the (frozen or thawed) chicken in the bottom of the Instant Pot. Add 1 cup water, then lock the lid into place and turn the pressure valve to Seal. 1 lb frozen chicken breast, 1 cup water
Cook on high pressure using the manual function for 12 minutes. When done, let the pressure release naturally. This will prevent the chicken from drying out.
While the chicken is cooking, cook the turkey bacon in the oven according to the package. Cut into cubes and set aside until ready to use 4 slices turkey bacon.
Mix the cottage cheese, yogurt, garlic salt, onion powder, pepper, parsley, and dill together in a blender. Mix well until you have a ranch-like dressing. Set aside until ready to use. ¼ cup cheddar cheese, ¼ cup Greek yogurt, 1 tsp garlic salt, 1 tsp onion powder, ½ tsp pepper, ½ tsp parsley, 1 tsp fresh dill
Drain and shred the chicken. Add the dressing from the blender, turkey bacon, and cheddar cheese over the chicken. Mix well. You can turn the Instant Pot to sauté to help the melt the cheese if your chicken has cooled. ¼ cup cheddar cheese
Slow Cooker Directions:
Add 1 cup water or low sodium chicken broth to the crockpot. Add the chicken and cook on high heat for 4 hours. 1 cup water, 1 lb frozen chicken breast
While the chicken is cooking, cook the bacon in the oven. Cube it when it’s finished cooking. 4 slices turkey bacon
Blend together the cottage cheese, Greek yogurt, garlic salt, onion powder, pepper, parsley, and dill in the food processor or blender. ¾ cup cottage cheese, ¼ cup Greek yogurt, 1 tsp garlic salt, 1 tsp onion powder, ½ tsp pepper, ½ tsp parsley, 1 tsp fresh dill
Pour the sauce into your shredded chicken. Add turkey bacon and cheddar cheese. Optional: Add back to the slow cooker if you want to keep it warm for later. ¼ cup cheddar cheese
Stovetop Directions:
Bake or broil the chicken to cook. I prefer boiling it in a pot of water. 1 lb frozen chicken breast
Cook the bacon at 400 degrees for about 15 minutes. When it’s done, cube it. 4 slices turkey bacon
When the chicken is done cooking, shred it with two forks or a mixer.
Mix the cottage cheese, Greek yogurt, garlic salt, onion powder, pepper, parsley, and dill in a food processor or blender. ¾ cup cottage cheese, ¼ cup Greek yogurt, 1 tsp garlic salt, 1 tsp onion powder, ½ tsp pepper, ½ tsp parsley, 1 tsp fresh dill
Pour the sauce over the shredded chicken. Add the cooked bacon and cheddar cheese. ¼ cup cheddar cheese
This WW Crack Chicken is just 3 Points on the 2023 Plan | 3 Blue Plan Points | 5 Green Plan Points | 3 Purple Plan Points per serving, when using lowfat cottage cheese and fat free Greek yogurt. I use the WW website to calculate this recipe based on ingredients, not nutrition information. WW has told me that this is the most accurate way to count.

Ingredients:

  • 1 cup low-fat cottage cheese
  • 4 large eggs
  • 1/4 cup chopped fresh chives
  • 1/4 teaspoon salt
  • 1/4 teaspoon black pepper
  • Cooking spray

Instructions:

  1. Preheat your oven to 350°F (175°C). Lightly coat a baking dish with cooking spray.
  2. In a mixing bowl, combine the cottage cheese, eggs, chopped chives, salt, and black pepper. Mix well until all ingredients are evenly incorporated.
  3. Pour the mixture into the prepared baking dish, spreading it out evenly.
  4. Bake in the preheated oven for 25-30 minutes, or until the eggs are set and the edges are golden brown.
  5. Once done, remove from the oven and let it cool for a few minutes before serving.

Nutritional Information (per serving):

  • Serving Size: 1/4 of the dish
  • Calories: 130
  • Total Fat: 6g
    • Saturated Fat: 2g
    • Trans Fat: 0g
  • Cholesterol: 195mg
  • Sodium: 440mg
  • Total Carbohydrates: 3g
    • Dietary Fiber: 0g
    • Sugars: 2g
  • Protein: 15g

Weight Watchers Points:

  • Green Plan: 3 points per serving
  • Blue Plan: 2 points per serving
  • Purple Plan: 2 points per serving

This Baked Cottage Cheese Eggs recipe offers a comforting and nutritious start to your day without sacrificing flavor. Enjoy!