Author

Lena Blaze

Browsing

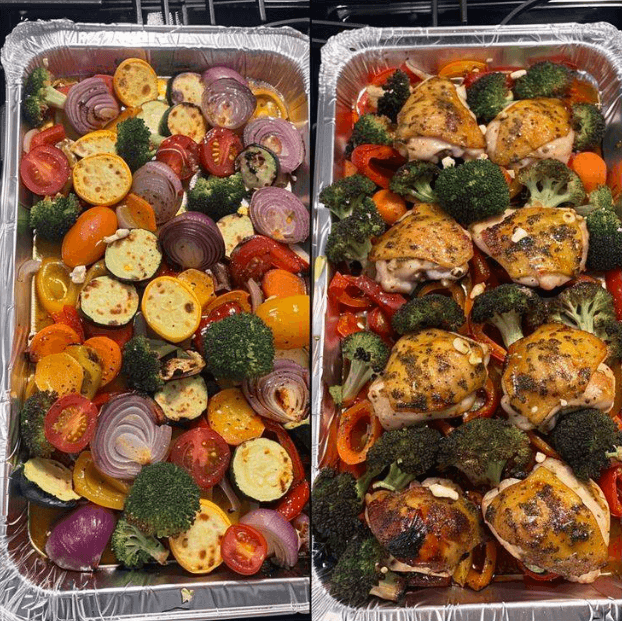
15-Minute Healthy Roasted Chicken and Veggies: A Comprehensive WW-Friendly Recipe

Welcome to our detailed guide on preparing a 15-minute Healthy Roasted Chicken and Veggies dish that fits perfectly into a Weight Watchers (WW) plan. This quick and nutritious recipe is designed for those seeking a low-point meal that doesn’t compromise on flavor or satisfaction. Below, you’ll find a thorough breakdown of the recipe, including ingredient measurements, detailed instructions, nutritional information, and WW SmartPoints values.

Ingredients

For the Roasted Chicken and Veggies:

  • 2 Chicken Breasts, cut into 1-inch pieces (about 12 oz total)
  • ¾ cup yellow onion, chopped
  • 1 small zucchini, chopped
  • 1½ cup multi-colored bell peppers, chopped (mix of red, yellow, and green)
  • 1 cup broccoli florets
  • 1 cup tomatoes, chopped
  • 2 tablespoons olive oil
  • ½ teaspoon paprika
  • 2 teaspoons Italian seasoning
  • ½ teaspoon salt
  • ½ teaspoon black pepper

Instructions

  1. Preheat the Oven:
    • Preheat your oven to 425°F (220°C). This high temperature will ensure that your chicken and vegetables roast quickly and develop a crispy exterior.
  2. Prepare the Chicken:
    • Cut the chicken breasts into bite-sized pieces, approximately 1 inch in size. This ensures that the chicken cooks evenly and quickly.
  3. Chop the Vegetables:
    • Dice the yellow onion, chop the zucchini, bell peppers, and tomatoes into bite-sized pieces, and separate the broccoli into florets. Uniform sizes help in even cooking.
  4. Season the Chicken and Vegetables:
    • In a large bowl, combine the chicken pieces, yellow onion, zucchini, bell peppers, broccoli florets, and chopped tomatoes. Drizzle with 2 tablespoons of olive oil.
  5. Add Spices:
    • Sprinkle ½ teaspoon paprika, 2 teaspoons Italian seasoning, ½ teaspoon salt, and ½ teaspoon black pepper over the chicken and vegetables. Toss everything together until the chicken and veggies are evenly coated with the oil and spices.
  6. Prepare the Baking Sheet:
    • Line a large baking sheet with parchment paper or lightly grease it with cooking spray. This prevents sticking and makes for easier cleanup.
  7. Spread Out the Ingredients:
    • Spread the seasoned chicken and vegetables in a single layer on the prepared baking sheet. Avoid overcrowding to ensure proper roasting.
  8. Roast in the Oven:
    • Place the baking sheet in the preheated oven. Roast for 15-20 minutes, or until the chicken is fully cooked and reaches an internal temperature of 165°F (74°C). The vegetables should be tender and slightly caramelized.
  9. Check for Doneness:
    • Halfway through roasting, stir the ingredients to ensure even cooking. Return to the oven and continue roasting until everything is nicely browned and cooked through.
  10. Cool Slightly:
    • Once roasted, remove the baking sheet from the oven. Let the chicken and vegetables cool for a few minutes before serving. This allows the flavors to meld and makes it easier to serve.
  11. Serving Suggestions:
    • Serve the roasted chicken and veggies on their own or with a side of quinoa or brown rice for a complete meal. You can also top with a sprinkle of fresh herbs or a squeeze of lemon juice for added flavor.
  12. Storage Tips:
    • Store any leftovers in an airtight container in the refrigerator for up to 3 days. For longer storage, freeze the chicken and veggies in a freezer-safe container or bag for up to 2 months. Reheat thoroughly before serving.
  13. Reheating Instructions:
    • To reheat, microwave the leftovers for 2-3 minutes or until heated through. Alternatively, reheat in an oven at 350°F (175°C) for about 10 minutes.
  14. Nutritional Benefits:
    • This dish is rich in lean protein from the chicken, and packed with fiber and vitamins from the assortment of vegetables. The use of olive oil provides healthy fats that are beneficial for overall health.
  15. Dietary Considerations:
    • This recipe is suitable for most dietary preferences, including low-carb and low-fat diets. Adjust the seasoning to suit your taste or dietary restrictions.
  16. Flavor Variations:
    • Customize the recipe by adding other herbs and spices like garlic powder, cumin, or rosemary. You can also swap in different vegetables based on what you have on hand.
  17. Meal Prep:
    • This dish is ideal for meal prepping. Make a batch and portion it into single-serving containers for quick and easy lunches or dinners throughout the week.
  18. Special Occasions:
    • Use this recipe as a healthy option for family dinners or gatherings. It’s simple to prepare, yet flavorful and satisfying.
  19. Weight Watchers Considerations:
    • By using minimal oil and focusing on lean protein and vegetables, this recipe aligns well with WW guidelines, offering a filling meal without excessive points.
  20. Nutritional Information and SmartPoints:

Nutritional Information (Per Serving, Makes 4 Servings)

  • Calories: 220
  • Total Fat: 10g
    • Saturated Fat: 1.5g
  • Cholesterol: 70mg
  • Sodium: 400mg
  • Total Carbohydrates: 14g
    • Dietary Fiber: 5g
    • Sugars: 6g
  • Net Carbohydrates: 9g
  • Protein: 22g

Weight Watchers SmartPoints Value:

  • SmartPoints: 4 (per serving, based on Weight Watchers 2024 calculation)

Conclusion

This 15-minute Healthy Roasted Chicken and Veggies recipe is a perfect low-point, nutritious option for those following the Weight Watchers program. It combines lean protein with a variety of colorful vegetables, seasoned to perfection. The quick preparation and roasting time make it an ideal choice for busy weeknights, and its healthful ingredients ensure you stay on track with your dietary goals. Enjoy this delicious and satisfying meal while keeping your WW points in check.

Weight Watchers Chocolate Eclair Dessert | No Bake

This Weight Watchers Chocolate Eclair Dessert | No-Bake Recipe turned out delicious and was really easy to make! This recipe is definitely a keeper!

Servings: Makes 12 servings

8 Points™ per serving

I add every day new WW recipes, so check back often!

My site is not affiliated with Weight Watchers in any way. I just love creating healthier recipe options. I don’t give any advice on diet or eating habits.

Double-check points on the official calculator.

HOW DO I MAKE MY CHOCOLATE ECLAIR DESSERT?

1. Mix together vanilla pudding mix and 3 cups of milk.

2. Let set for 2 minutes.

3. Fold in whipped topping.

4. Lay 8 graham crackers in the bottom of a 13X9 inch pan.

5. Cover with half of the vanilla pudding mixture.

6. Top with another layer of graham crackers and cover those with the remaining vanilla pudding mixture.

7. Top with a final layer of graham crackers.

8. Mix together the chocolate pudding mix and the remaining 1 1/2 cups milk, let set for two minutes.

9. Pour chocolate pudding over graham crackers.

10. Refrigerate for 6 hours or overnight.

Ingredients:

  • 22 and 1/2 low-fat graham cracker sheets
  • 12 oz fat-free whipped topping (I used Kroger but the Cool Whip brand is lower in points and what I prefer to use but I am unable to find it where I live)
  • 1 package sugar-free, fat-free, chocolate pudding and pie mix
  • 2 packages of sugar-free, fat-free vanilla pudding and pie mix
  • 4 1/2 cups skim milk, divided
  1. Mix together vanilla pudding mix and 3 cups of milk.
  2. Let set for 2 minutes.
  3. Fold in whipped topping.
  4. Lay 8 graham crackers in the bottom of a 13X9 inch pan.
  5. Cover with half of the vanilla pudding mixture.
  6. Top with another layer of graham crackers and cover those with the remaining vanilla pudding mixture.
  7. Top with a final layer of graham crackers.
  8. Mix together the chocolate pudding mix and the remaining 1 1/2 cups milk, let set for two minutes.
  9. Pour chocolate pudding over graham crackers.
  10. Refrigerate for 6 hours or overnight.

Notes

Servings: Makes 12 servings

Introduction:

Explore a unique and nutritious twist with our Zucchini Oatmeal recipe, tailored for those following the Weight Watchers (WW) plan. This innovative dish combines the wholesome goodness of oats with the subtle sweetness and nutritional benefits of zucchini. Perfect for a hearty breakfast or a satisfying snack, Zucchini Oatmeal offers a delightful way to incorporate more vegetables into your diet while enjoying a comforting meal. Discover the step-by-step process to create this wholesome dish and indulge in its savory-sweet flavors.

Benefits of Zucchini Oatmeal:

Zucchini is a versatile vegetable that adds:

  • Nutritional Value: Rich in vitamins A and C, potassium, and fiber, zucchini enhances the nutritional profile of your meal.
  • Texture and Flavor: When cooked, zucchini becomes tender and adds a mild sweetness that complements the oats.
  • Low in Calories: Zucchini is naturally low in calories, making it a great addition to weight-conscious diets like WW.

Ingredients:

  • 1/2 cup old-fashioned oats
  • 1 cup grated zucchini (about 1 medium zucchini)
  • 1 cup unsweetened almond milk (or any milk of choice)
  • 1 tablespoon maple syrup (optional, adjust SmartPoints® accordingly)
  • 1/2 teaspoon ground cinnamon
  • Pinch of salt
  • Optional toppings: fresh berries, chopped nuts, additional cinnamon

Instructions:

  1. Prepare Zucchini: Wash and grate the zucchini using a box grater or food processor. Squeeze out excess moisture using a clean kitchen towel or paper towels.
  2. Cook Oatmeal: In a medium saucepan, combine old-fashioned oats, grated zucchini, unsweetened almond milk, maple syrup (if using), ground cinnamon, and a pinch of salt. Stir well to combine.
  3. Simmer and Stir: Bring the mixture to a gentle boil over medium heat. Reduce heat to low and simmer, stirring occasionally, until the oats are cooked and the mixture has thickened to your desired consistency, about 5-7 minutes.
  4. Adjust Consistency: If the oatmeal becomes too thick, add a splash of almond milk to reach your preferred texture.
  5. Serve and Garnish: Remove from heat and transfer the Zucchini Oatmeal to serving bowls. Garnish with fresh berries, chopped nuts, and an extra sprinkle of cinnamon for added flavor and presentation.

Nutritional Information:

  • Serving Size: 1 cup
  • Calories: 180
  • Total Fat: 4g
  • Saturated Fat: 0.5g
  • Cholesterol: 0mg
  • Sodium: 80mg
  • Total Carbohydrate: 32g
  • Dietary Fiber: 5g
  • Sugars: 7g
  • Protein: 6g

SmartPoints (WW):

  • Each serving of Zucchini Oatmeal is approximately 5 SmartPoints® on the WW plan, based on the ingredients listed. Adjust SmartPoints® values if using additional toppings or sweeteners.

Additional Tips:

  • Enhance Flavor: Experiment with different spices such as nutmeg or cardamom for a unique twist on the flavor profile.
  • Meal Prep: Prepare a batch of Zucchini Oatmeal ahead of time and store in individual containers for quick and convenient breakfasts throughout the week.
  • Health Benefits: Oats are a great source of soluble fiber, which helps promote a feeling of fullness and supports digestive health. Combined with zucchini, this dish offers a satisfying and nutritious start to your day.

Conclusion:

Enjoy the wholesome goodness of our Zucchini Oatmeal, a nourishing and flavorful dish that fits seamlessly into your WW journey. Whether you’re seeking a hearty breakfast option or a nutritious snack, this recipe provides a balanced blend of oats and zucchini’s natural sweetness. Embrace the versatility of zucchini in cooking and discover a new way to enjoy oatmeal with added fiber and vitamins. Treat yourself to a satisfying meal that supports your wellness goals and delights your taste buds with every spoonful of Zucchini Oatmeal!

1 POINT Chicken patties

Total Time: 35 min | Prep: 15 min | Cook: 20 min

Serves: 15 | Difficulty: Easy

Ingredients

Chicken breast mince: 500 g

Sweet potato (kumara), cooked without added fat: 200 g, mashed

Red onion: 1 medium, finely chopped

Garlic: 2 clove(s), finely grated

Fresh flat-leaf parsley: 2 tbs, chopped, plus extra to serve

Fresh basil: 2 tbs, chopped

Egg(s): 1 medium

Panko breadcrumbs: 100 g

Grated parmesan cheese: ¼ cup(s), (20g)

Olive oil: 2 tsp

Light sweet chilli sauce: 2 tbs

Instructions

  1. Place mince, sweet potato, onion, garlic, herbs, egg, breadcrumbs and parmesan in a large bowl. Season with salt and pepper and mix well. Using an ice cream scoop, shape mixture into 15 patties.
  2. Heat half the oil in a large non-stick frying pan over medium heat. Cook half the patties for 5 minutes on each side, or until golden brown and cooked through. Repeat with remaining oil and patties. Transfer patties to a serving plate with sauce. Sprinkle with extra parsley and serve.

Notes

You’ll need to cook about 300 g peeled, chopped sweet potato to yield 200 g once it’s cooked. Boil, steam, microwave or roast until tender, then coarsely mash.

Indulging in desserts while maintaining a healthy lifestyle can sometimes feel like a balancing act. Luckily, these Irresistible Mini Chocolate Peanut Butter Pies are a perfect solution. They are not only delicious but also designed to fit seamlessly into a Weight Watchers (WW) plan, making them an ideal treat for any occasion. In this detailed guide, we will walk you through the entire process—from ingredients to instructions—ensuring you can create these delightful pies with ease. Let’s dive into this culinary adventure!

Ingredients

For the Crust:

  • 1 cup crushed low-fat graham crackers (approximately 8 full sheets)
  • 2 tablespoons granulated sugar (or a suitable sugar substitute)
  • 3 tablespoons unsalted butter, melted (or light margarine)

For the Filling:

  • 1 cup low-fat cream cheese, softened
  • 1/2 cup natural peanut butter (smooth or crunchy based on your preference)
  • 1/2 cup powdered sugar (or a suitable sugar substitute)
  • 1 teaspoon vanilla extract
  • 1/2 cup fat-free whipped topping (like Cool Whip)

For the Chocolate Layer:

  • 1/2 cup semi-sweet chocolate chips (or sugar-free chocolate chips for a lower point option)
  • 1 tablespoon unsweetened cocoa powder
  • 1 tablespoon light corn syrup
  • 1 teaspoon vanilla extract
  • 1 tablespoon water (if needed for consistency)

Equipment Needed

  1. Mini muffin tin (for shaping the pies)
  2. Mixing bowls (both medium and large)
  3. Electric mixer (or a whisk for manual mixing)
  4. Microwave-safe bowl (for melting chocolate)
  5. Spatula (for spreading)
  6. Measuring cups and spoons

Instructions

Step 1: Prepare the Crust

  1. Preheat Your Oven: Begin by preheating your oven to 350°F (175°C). This step is crucial as it ensures your crust bakes evenly.
  2. Mix Dry Ingredients: In a medium-sized bowl, combine 1 cup of crushed low-fat graham crackers with 2 tablespoons of granulated sugar (or your preferred sugar substitute). Mix thoroughly to ensure the sugar is evenly distributed.
  3. Add Melted Butter: Pour in 3 tablespoons of melted unsalted butter and mix until the crumb mixture resembles wet sand. This moisture is essential for helping the crust hold together.
  4. Shape the Crust: Lightly spray your mini muffin tin with cooking spray to prevent sticking. Use about 1 tablespoon of the crumb mixture for each cup, pressing it down firmly to form a solid base. Make sure to pack it tightly for stability.
  5. Bake the Crust: Place the muffin tin in the preheated oven and bake for 5-7 minutes. You’re looking for a light golden color. Once done, remove from the oven and let it cool completely in the tin.

Step 2: Make the Filling

  1. Cream the Cheese: In a large mixing bowl, add 1 cup of softened low-fat cream cheese. Using an electric mixer, beat it until smooth and creamy. This creates a rich, fluffy base for your filling.
  2. Incorporate Peanut Butter: Next, add 1/2 cup of natural peanut butter to the cream cheese. Mix until well blended. The combination of these two ingredients results in a deliciously creamy filling.
  3. Sweeten It Up: Gradually add in 1/2 cup of powdered sugar and 1 teaspoon of vanilla extract. Continue mixing until everything is fully incorporated and smooth.
  4. Fold in Whipped Topping: Gently fold in 1/2 cup of fat-free whipped topping. This step is crucial as it adds lightness to the filling. Use a spatula to ensure you maintain the fluffy texture.
  5. Fill the Crusts: Once your crusts have cooled, carefully spoon the peanut butter filling into each mini crust, filling them almost to the top. Use a spatula to smooth the filling for an even finish.

Step 3: Prepare the Chocolate Layer

  1. Melt the Chocolate: In a microwave-safe bowl, combine 1/2 cup of chocolate chips, 1 tablespoon of unsweetened cocoa powder, and 1 tablespoon of light corn syrup. Microwave in 30-second intervals, stirring after each interval until melted and smooth.
  2. Adjust Consistency: If the chocolate mixture is too thick, add 1 tablespoon of water, mixing until you achieve a drizzling consistency. This chocolate layer will add a decadent touch to your mini pies.
  3. Top the Pies: Carefully drizzle or spread the chocolate mixture over the peanut butter filling of each mini pie. This not only enhances flavor but also gives a beautiful finish.

Step 4: Chill and Serve

  1. Refrigerate: Place the mini pies in the refrigerator for at least 2 hours, allowing the filling to set properly. This step is vital for achieving the perfect texture.
  2. Garnish (Optional): Before serving, consider adding a dollop of additional whipped topping or a sprinkle of crushed peanuts on top for an extra special touch.
  3. Serve Cold: These mini pies are best served chilled. Enjoy them at gatherings or as a satisfying treat during the week.

Nutritional Information (Per Mini Pie)

  • Calories: Approximately 120
  • Total Fat: 7g
  • Saturated Fat: 2.5g
  • Cholesterol: 20mg
  • Sodium: 85mg
  • Total Carbohydrates: 12g
  • Dietary Fiber: 1g
  • Sugars: 5g
  • Protein: 3g

SmartPoints Calculation

Each mini pie is approximately 4-5 Weight Watchers SmartPoints, depending on the specific ingredients used. It’s always best to calculate points based on the brands you choose to ensure accuracy.

Useful Tips

  • Ingredient Substitutions: For an even lower point option, consider using sugar-free chocolate chips and a sugar substitute in the filling.
  • Variations: Feel free to experiment with flavors! Adding a dash of cinnamon or using almond butter instead of peanut butter can give a delightful twist.
  • Storage: Store any leftovers in an airtight container in the refrigerator for up to 3 days, ensuring they stay fresh and tasty.

Conclusion

These Irresistible Mini Chocolate Peanut Butter Pies are a perfect blend of rich flavors and healthy ingredients, making them a fantastic option for those following a Weight Watchers plan. Whether you’re entertaining guests or treating yourself, these mini pies are sure to impress. With a detailed preparation method and nutritional breakdown, you can enjoy these delicious desserts guilt-free. Happy baking!

Ingredients:

  • 4 cups shredded cooked chicken breast (skinless)
  • 2 cups cooked brown rice (or cauliflower rice for fewer points)
  • 1 (10.5-ounce) can of 98% fat-free cream of chicken soup
  • 1 cup plain non-fat Greek yogurt (instead of sour cream)
  • 1 cup frozen diced onion and bell pepper blend
  • 1 (10-ounce) can diced tomatoes with chilies (like Ro*Tel), undrained
  • 1 1/2 cups low-sodium chicken broth
  • 1 (1.12-ounce) packet reduced-sodium fajita seasoning
  • 1 cup reduced-fat shredded Mexican blend cheese (about 2 cups)

Instructions:

  1. Preheat your oven to 350°F and lightly spray a 9×13-inch casserole dish with nonstick cooking spray.
  2. In a large bowl, combine the shredded chicken, cooked brown rice (or cauliflower rice), cream of chicken soup, Greek yogurt, frozen onion and bell pepper blend, diced tomatoes with chilies, chicken broth, fajita seasoning, and half of the shredded cheese. Mix until well combined.
  3. Pour the mixture into the prepared casserole dish and spread it evenly.
  4. Cover with aluminum foil and bake for 35 minutes.
  5. Remove the foil, sprinkle the remaining shredded cheese on top, and bake uncovered for another 10 minutes, or until the cheese is melted and bubbly.
  6. Let the casserole cool for a few minutes before serving.

Tips:

  • Rice Substitute: Using cauliflower rice instead of instant rice will significantly reduce the points and add more vegetables to your dish.
  • Greek Yogurt: Substituting Greek yogurt for sour cream cuts down on fat and adds extra protein.
  • Cheese: Opt for reduced-fat cheese to keep the points low without sacrificing flavor.
  • Vegetable Boost: Add more veggies like zucchini or spinach to increase fiber content and add bulk without adding many points.

Benefits:

  • Lower Points: This modified recipe reduces the overall points, making it easier to fit into your daily plan.
  • High Protein: Using shredded chicken breast and Greek yogurt increases the protein content, keeping you full longer.
  • Balanced Meal: The dish is a good balance of protein, carbs, and fat, making it a satisfying meal.

Nutritional Information (Approximate per Serving, 8 servings):

Weight Watchers Points: Approximately 6 points per serving (using cauliflower rice can reduce this further)

Calories: ~250 kcal

Protein: ~25g

Fat: ~8g

Crispy Pork Belly Tacos

Ingredients:
For the Tacos:
1 1/2 pounds pork tenderloin, trimmed and cut into 1/4-inch thick strips (leaner substitute for pork belly)
8 oz. turkey or chicken sausage (lean substitute for chorizo)
Salt, pepper, and garlic powder (to taste)
1/2 cup crushed pineapple, strained (use in moderation)
8 small corn tortillas (lower in points than flour tortillas)
1/2 cup reduced-fat shredded Jack cheese
1/2 cup reduced-fat shredded Mexican Oaxaca cheese
Diced onion (to taste)
Chopped cilantro (to taste)
Optional: fresh lime juice or Weight Watchers-friendly Avocado Lime Crema (recipe below)
For the Avocado Lime Crema:
1 large avocado
1/2 cup fat-free Greek yogurt (substitute for sour cream)
1/4 cup unsweetened almond milk or skim milk
1/2 cup cilantro
Juice of 2 limes
1 tsp salt
Instructions:

Prepare the Pork Tenderloin:
Cut the pork tenderloin into 1/4-inch thick strips. Season with salt, pepper, and garlic powder.
Heat a griddle or skillet to medium heat and set up two zones: hot and cool.
Sear the pork tenderloin strips in the hot zone for 2-3 minutes on each side until crispy.
Remove the pork tenderloin from the griddle, chop into small chunks, and set aside.
Cook the Sausage:
Add the turkey or chicken sausage to the hot zone and cook for about 5-6 minutes, breaking it apart as it cooks.
Add the chopped pork tenderloin back to the griddle with the sausage.
Strain the crushed pineapple and add it to the griddle. Mix everything together and cook for another 4-5 minutes.
Slide the mixture to the cool zone to keep it warm.
Prepare the Tacos:
Turn the burner to low and clean the griddle surface.
Toast one side of the corn tortillas on the griddle.
Flip the tortillas and sprinkle with the reduced-fat cheese mixture.
Once the cheese starts to melt, add the pork tenderloin, sausage, and pineapple filling.
Fold the tortillas in half to form tacos and crisp on both sides until golden brown.

Remove the tacos from the griddle and garnish with diced onion and chopped cilantro.
Optionally, squeeze fresh lime juice over the tacos or drizzle with Avocado Lime Crema.
Prepare the Avocado Lime Crema:
In a blender, combine the avocado, fat-free Greek yogurt, unsweetened almond milk or skim milk, cilantro, lime juice, and salt.
Blend until smooth. Drizzle over tacos or serve as a dipping sauce.
Tips:
Lean Proteins: Substituting pork tenderloin for pork belly and turkey/chicken sausage for chorizo significantly reduces the fat and points while keeping the flavor intact.
Reduced-Fat Cheese: Using reduced-fat cheese options helps maintain a rich taste while lowering points.
Portion Control: Use smaller tortillas and moderate portions of the filling to control points and calorie intake.
Avocado Lime Crema: This lighter version uses fat-free Greek yogurt instead of full-fat sour cream, reducing points while adding protein.
Benefits:
Lower in Points: Leaner cuts of meat and reduced-fat dairy make this version of the recipe more Weight Watchers-friendly.
High in Protein: The lean meats and Greek yogurt contribute to a high-protein meal, which helps with satiety and muscle maintenance.
Rich in Flavor: Despite the lighter ingredients, the tacos remain flavorful and satisfying due to the use of spices, fresh herbs, and lime.
Nutritional Information (Approximate per Taco, Makes 8 Tacos):
Calories: ~250 kcal
Protein: ~18g
Fat: ~10g
Saturated Fat: ~3g
Carbohydrates: ~20g
Fiber: ~3g
Sugars: ~3g
Weight Watchers Points: Approximately 5-6 points per taco (depending on specific brands and portions used)
These Weight Watchers-friendly Crispy Pork Tenderloin Tacos offer a delicious and satisfying meal while helping you stay on track with your points!

This delightful Pineapple Chicken and Rice dish is a harmonious blend of lean protein, vibrant vegetables, and the tropical sweetness of pineapple. Inspired by a cherished family recipe, it has been thoughtfully adapted to align with Weight Watchers’ SmartPoints system, ensuring a delicious yet mindful dining experience.​


For the Chicken and Rice:

  • 500g boneless, skinless chicken breast, diced
  • 1 cup jasmine rice, rinsed
  • 1 tablespoon olive oil
  • 1 medium onion, finely chopped
  • 2 cloves garlic, minced
  • 1 medium red bell pepper, diced
  • 1 medium yellow bell pepper, diced
  • 1 cup fresh pineapple chunks (or canned in juice, drained)
  • 1/4 cup low-sodium soy sauce
  • 1 tablespoon rice vinegar
  • 1 tablespoon honey
  • 1 teaspoon grated fresh ginger
  • 1/2 teaspoon ground black pepper
  • 1/4 teaspoon salt
  • 2 green onions, sliced (for garnish)

Optional Add-ins:

  • 1/2 cup frozen peas
  • 1/2 cup sliced carrots
  • 1 tablespoon sesame seeds

Step 1: Prepare the Rice

  1. In a medium saucepan, combine the rinsed jasmine rice with 1.5 cups of water.
  2. Bring to a boil over medium-high heat.
  3. Once boiling, reduce the heat to low, cover, and simmer for 15 minutes or until the water is absorbed and the rice is tender.
  4. Remove from heat and let it sit, covered, for 5 minutes. Fluff with a fork before serving.​

Step 2: Cook the Chicken

  1. While the rice is cooking, heat the olive oil in a large skillet or wok over medium-high heat.
  2. Add the diced chicken breast to the skillet.
  3. Season with salt and black pepper.
  4. Cook for 6-8 minutes, stirring occasionally, until the chicken is browned and cooked through.
  5. Remove the chicken from the skillet and set aside.​

Step 3: Sauté the Vegetables

  1. In the same skillet, add a bit more olive oil if necessary.
  2. Add the chopped onion and minced garlic.
  3. Sauté for 2-3 minutes until the onion becomes translucent.
  4. Add the diced red and yellow bell peppers.
  5. Cook for an additional 3-4 minutes until the peppers are tender.​

Step 4: Combine Ingredients

  1. Return the cooked chicken to the skillet with the sautéed vegetables.
  2. Add the fresh pineapple chunks.
  3. In a small bowl, whisk together the soy sauce, rice vinegar, honey, and grated ginger.
  4. Pour the sauce over the chicken and vegetables.
  5. Stir well to combine and coat everything evenly.
  6. Cook for an additional 2-3 minutes, allowing the sauce to thicken slightly.​

Step 5: Serve

  1. Spoon the cooked jasmine rice onto serving plates.
  2. Top with the pineapple chicken mixture.
  3. Garnish with sliced green onions and sesame seeds if desired.
  4. Serve immediately and enjoy!​
  5.  SmartPoints Breakdown
  6. Blue Plan: 6 SmartPoints
  7. Green Plan: 7 SmartPoints
  8. Purple Plan: 5 SmartPoints

Pizza Muffins
Weight Watchers Pizza Muffins are mouth-watering and tasty. It’s a tempting appetizer. This recipe is easy to make. It’s a Weight Watchers-friendly recipe. It contains only 2 Weight Watchers Points. These fluffy, tasty Weight Watchers pizza muffins will not affect your weight. It’s one serving that is
Why do people love these mini pizzas?
People like these Weight Watchers mini pizzas because.

Easy-to-go recipe
Kids’ favourite lunch meal
Low in calories. It contains only 33 calories.
Will not affect your weight
Ingredients
Flour 3/4 cup
Baking Powder 1tsp
Garlic powder 1/4tsp
Black pepper 1/4tsp, add according to taste
Salt 1/4tsp, add according to taste
Milk 3/4 cup
Grated cheese 1 tbsp, use parmesan cheese, or cheddar cheese
Mozzarella cheese 1/3cup used fat-free cheese

Asiago cheese 1/4 cup, grated
Low Point Bacon 3 slices
Pepperoni 20 slices
Dried oregano 2tsp
Eggs 8
Instructions
To make Weight Watchers Pizza Muffins, follow some steps.
First, adjust the oven temperature to 375 degrees.
Next, spray the baking tray with oil. Set aside the muffin tray.
Now, take a bowl. Add milk, and egg together. Whisk it until it combines.
Set aside this bowl.
Add flour, garlic, salt, pepper, baking powder, oregano, and Italian seasoning in the second bowl.
Combine all ingredients.

Now, mix the dry ingredients with the egg and milk mixture.
Add all cheese to this mixture. Combine it well.
Next, cut the pepperoni and cooked bacon into small bite sizes.
Mix into the batter mixture.
Now, add pizza muffin batter to a baking tray.
To enhance the flavour, top it with Italian seasoning.
Bake pizza muffins for 20- 25 minutes, or until the muffins are crunchy and brown.
The Weight Watchers Pizza Muffins are ready to eat and serve.
Serve mini muffins with marinara sauce, and ketchup.
Tips
To enhance the flavours, add any kind of seasoning.
Don’t over-whisk the ingredients.
For baking, measure all ingredients through a measuring cup. fulfilling and also satisfies your cravings. It’s perfect for lunches or parties.

Introduction

Welcome to our recipe for Ultra-Low Point Biscoff Dessert Cups, designed specifically for those following a Weight Watchers (WW) plan or anyone looking for a delicious dessert option with minimal points. These dessert cups feature the irresistible flavors of Lotus Biscoff cookies combined with a light and creamy filling, all while keeping the points low. Perfect for satisfying your sweet tooth without derailing your diet, these dessert cups are easy to prepare and bursting with flavor. Follow along for detailed instructions on creating this guilt-free indulgence.

Ingredients

  • 7 oz Lotus Biscoff cookies, crushed into crumbs
  • 5 Lotus Biscoff cookies, whole (for garnish)
  • 1 ¾ cups unsweetened almond milk (or skim milk for a slight increase in points)
  • 1 ½ tablespoons sugar-free custard powder
  • 2 tablespoons powdered erythritol (or another sugar substitute of choice)
  • 1 ¾ cups light whipped topping (such as Cool Whip Free)
  • Pinch of vanilla powder or a few drops of vanilla extract

Instructions

  1. Prepare Biscoff Crumbs:
    • Place 7 oz of Lotus Biscoff cookies in a food processor and pulse until finely crushed. Alternatively, place them in a plastic bag and crush them with a rolling pin. Set aside.
  2. Make Custard:
    • In a saucepan, combine unsweetened almond milk, sugar-free custard powder, and powdered erythritol. Whisk until well combined and there are no lumps.
    • Heat the mixture over medium heat, stirring constantly, until it thickens and begins to boil gently. Remove from heat and let it cool slightly.
  3. Assemble the Dessert Cups:
    • Divide the crushed Biscoff crumbs evenly among 6 serving cups or glasses, reserving a small amount for garnish.
    • Spoon the cooled custard mixture over the Biscoff crumbs in each cup.
  4. Prepare Whipped Topping:
    • In a mixing bowl, combine the light whipped topping with vanilla powder or extract. Mix gently until well incorporated.
  5. Top and Chill:
    • Spoon a dollop of the whipped topping over each dessert cup, spreading it evenly to cover the custard layer.
    • Garnish each cup with a whole or crumbled Lotus Biscoff cookie.
  6. Chill and Serve:
    • Refrigerate the dessert cups for at least 1 hour, or until fully chilled and set.

Useful Information

  • Ingredient Tips: Using unsweetened almond milk and powdered erythritol significantly reduces the points. Opting for light whipped topping further lowers the overall points per serving.
  • Storage: Store leftover dessert cups covered in the refrigerator for up to 2 days. Serve chilled for best taste and texture.
  • Variations: For added flair, sprinkle a touch of cinnamon or cocoa powder over the whipped topping before garnishing with the cookie.

Nutrition Facts (per dessert cup)

  • Servings: 6
  • Calories: 150 kcal
  • Total Fat: 7g
  • Saturated Fat: 2g
  • Cholesterol: 0mg
  • Sodium: 160mg
  • Total Carbohydrates: 21g
  • Dietary Fiber: 1g
  • Sugars: 8g
  • Protein: 1g

Smart WW Points (per dessert cup)

  • Green Plan: 4 points
  • Blue Plan: 4 points
  • Purple Plan: 4 points

Conclusion

Our Ultra-Low Point Biscoff Dessert Cups are the perfect guilt-free indulgence for those on a Weight Watchers journey or anyone looking to enjoy a delicious dessert without compromising their diet goals. With their creamy custard filling, crunchy Biscoff cookie crumbs, and light whipped topping, these dessert cups offer a satisfying treat that won’t break your points bank. Indulge in the rich flavors of Biscoff while staying on track with your health goals. Treat yourself to these delightful dessert cups and savor every spoonful of this low-point delight!