Author

Lena Blaze

Browsing

Ingredients:

1 lb boneless, skinless chicken breast or thighs, diced

1 tbsp olive oil

1 medium onion, chopped

2 cloves garlic, minced

1 bell pepper (red or green), diced

1 cup corn kernels (fresh, frozen, or canned, drained)

1 can (15 oz) diced tomatoes (with or without green chilies)

1 can (15 oz) black beans, drained and rinsed

1 cup low-sodium chicken broth

1 cup water

1 tsp ground cumin

1 tsp smoked paprika

1/2 tsp chili powder

1/2 tsp garlic powder

1/2 tsp onion powder

1/4 tsp salt (to taste)

1/4 tsp black pepper (to taste)

1 cup fresh cilantro, chopped (optional, for garnish)

Juice of 1 lime (optional, for added brightness)

Instructions:

Cook the Chicken:

Heat the olive oil in a large pot over medium heat.

Add the diced chicken and cook until it is no longer pink and fully cooked, about 5-7 minutes. Remove the chicken from the pot and set aside.

Sauté the Vegetables:

In the same pot, add the chopped onion and cook until softened, about 3-4 minutes.

Add the minced garlic and bell pepper, cooking for another 2-3 minutes until fragrant.

Add Ingredients:

Return the cooked chicken to the pot.

Stir in the corn, diced tomatoes, black beans, chicken broth, and water.

Add the ground cumin, smoked paprika, chili powder, garlic powder, onion powder, salt, and black pepper. Stir to combine.

Simmer the Soup:

Bring the soup to a boil, then reduce the heat to low.

Let the soup simmer for 20-30 minutes, allowing the flavors to meld together.

Finish and Serve:

If using, stir in the chopped cilantro and lime juice just before serving for added freshness and brightness.

Taste and adjust seasoning if needed.

Serve:

Ladle the soup into bowls and enjoy hot.

This Southwest Chicken Soup is flavorful and satisfying, making it a great option for a light, nutritious meal.

Ingredients:

2 medium zucchinis, sliced into rounds
2 medium yellow squash, sliced into rounds
2 tablespoons butter
2 tablespoons all-purpose flour
1 cup milk
1 cup shredded cheddar cheese
1/4 cup grated Parmesan cheese
Salt and pepper to taste
1/4 cup breadcrumbs (optional)
Fresh parsley, chopped, for garnish

Directions:

Preheat the oven to 375°F (190°C) and grease a baking dish with butter or cooking spray.
In a large skillet, melt the butter over medium heat. Add the flour and cook, stirring constantly, for 1-2 minutes to make a roux.
Gradually whisk in the milk until smooth and thickened.
Stir in the cheddar cheese and Parmesan cheese until melted and smooth. Season with salt and pepper to taste.
Add the sliced zucchini and yellow squash to the cheese sauce, tossing to coat evenly.
Transfer the zucchini and squash mixture to the prepared baking dish, spreading it out evenly.
If desired, sprinkle breadcrumbs over the top of the gratin for added crunch.
Bake in the preheated oven for 25-30 minutes, or until the vegetables are tender and the top is golden brown and bubbly.
Garnish with chopped parsley before serving.

Serving Tips:

Serve the Zucchini and Yellow Squash Au Gratin as a flavorful side dish alongside roasted chicken, grilled steak, or baked fish for a complete meal.
Garnish each serving with freshly chopped parsley for a pop of color and added freshness.
Pair this gratin with a crisp green salad dressed with vinaigrette to balance out the richness of the cheesy sauce.
For a brunch or breakfast option, serve this gratin alongside scrambled eggs or a frittata for a satisfying start to the day.
Consider adding a sprinkle of red pepper flakes or a dash of hot sauce for a spicy kick if desired.

Storage Tips:

Store any leftover Zucchini and Yellow Squash Au Gratin in an airtight container in the refrigerator for up to 3-4 days.
Reheat individual portions in the microwave or oven until warmed through before serving.
To maintain the crispness of the breadcrumb topping, store any leftovers separately and sprinkle over the gratin just before reheating.
You can also freeze this gratin for longer-term storage. Place cooled individual portions in freezer-safe containers or wrap tightly with plastic wrap and aluminum foil. Freeze for up to 2-3 months.
Thaw frozen gratin overnight in the refrigerator before reheating. Bake in the oven until heated through, ensuring the vegetables are tender and the topping is crispy.
By following these serving and storage tips, you can enjoy the delicious flavors of Zucchini and Yellow Squash Au Gratin any time while ensuring its freshness and optimal taste.

Variations:

Herb Infusion: Enhance the flavor profile by adding fresh or dried herbs such as thyme, rosemary, or basil to the cheese sauce before baking.
Mushroom Medley: Incorporate sautéed mushrooms into the gratin for an earthy depth of flavor and added texture.
Protein Boost: Add cooked bacon, diced ham, or shredded rotisserie chicken to the gratin for a heartier dish that’s perfect for a main course.
Tomato Twist: Layer sliced tomatoes between the zucchini and yellow squash for a colorful variation. Sprinkle with Italian seasoning and mozzarella cheese for a caprese-inspired twist.
Spinach Surprise: Mix chopped spinach into the cheese sauce for an extra dose of greens and nutrients. This variation adds a vibrant color and a mild spinach flavor.
Spicy Kick: Add diced jalapeños or green chilies to the gratin for a spicy twist. Top with pepper jack cheese for an extra kick of heat.
Artichoke Addition: Incorporate chopped artichoke hearts into the gratin for a unique flavor and texture. This variation pairs well with Parmesan cheese and lemon zest.
Grilled Veggie Option: Instead of baking the zucchini and yellow squash, grill them until tender and charred before assembling the gratin. This adds a smoky flavor to the dish.
Vegan Version: Substitute dairy-free butter, milk, and cheese alternatives for a vegan-friendly option. Nutritional yeast can be used to add a cheesy flavor to the sauce.
Ratatouille-Inspired: Layer slices of zucchini, yellow squash, eggplant, and tomatoes in a baking dish. Top with the cheese sauce and bake until tender for a flavorful twist on the classic French dish.
Greek-Inspired: Add kalamata olives, diced tomatoes, and crumbled feta cheese to the gratin for a Mediterranean twist. Sprinkle with dried oregano and a drizzle of olive oil before baking.
Cheesy Broccoli Blend: Mix steamed broccoli florets into the cheese sauce for a nutritious addition. Top with extra cheddar cheese and buttery crackers for a crunchy topping.
Tex-Mex Fusion: Layer sliced jalapeños, black beans, corn kernels, and diced bell peppers between the zucchini and yellow squash. Top with pepper jack cheese and crushed tortilla chips for a Southwestern flair.
Caramelized Onion Elegance: Sauté thinly sliced onions until caramelized and layer them between the zucchini and yellow squash. Top with Gruyere cheese and breadcrumbs for an elevated twist.
Italian-Inspired: Add roasted red peppers, sliced black olives, and diced Italian sausage to the gratin for a hearty and flavorful dish. Sprinkle with Italian seasoning and mozzarella cheese before baking.

FAQs :

Can I use frozen zucchini and yellow squash for this recipe? While fresh produce is recommended for the best texture and flavor, you can use frozen zucchini and yellow squash if that’s what you have on hand. Be sure to thaw and drain them well before using.
Can I make this gratin ahead of time? Yes, you can assemble the gratin up to a day in advance and store it in the refrigerator. Simply bake it when ready to serve, adding a few extra minutes to the baking time if needed.
Can I use different types of cheese in the sauce? Absolutely! Feel free to experiment with different cheeses such as gruyere, fontina, or Monterey Jack to customize the flavor of the gratin.
How can I make this dish gluten-free? Use gluten-free all-purpose flour and breadcrumbs or omit the breadcrumbs altogether for a gluten-free version of this gratin.
Can I add other vegetables to the gratin? Yes, you can customize this recipe by adding other vegetables such as bell peppers, onions, or carrots. Just be sure to adjust the cooking time accordingly.
What can I serve with this gratin? This gratin pairs well with a variety of dishes including roasted meats, grilled fish, or a simple green salad for a complete meal.
Can I freeze leftovers of this dish? Yes, you can freeze leftovers of this gratin for up to 2-3 months. Just be sure to wrap it tightly or store it in an airtight container to prevent freezer burn.
How do I reheat the gratin? Reheat individual portions in the microwave until warmed through, or bake the entire gratin in the oven at 350°F (175°C) until heated through.
Can I make this dish dairy-free? Yes, you can use dairy-free alternatives such as plant-based milk, butter, and cheese to make this gratin dairy-free.
What size baking dish should I use? A 9×13 inch baking dish or similar size is recommended for this recipe. Adjust the quantities accordingly if using a smaller or larger dish.
Enjoy this comforting Zucchini and Yellow Squash Au Gratin as a side dish or a delicious vegetarian main course. With its creamy cheese sauce and tender vegetables, it’s sure to be a hit at any meal!

Banana Chocolate Chip Muffins Recipe

Ingredients:

2 ripe bananas (mashed)

1/2 cup (120ml) vegetable oil or melted butter

1/2 cup (100g) granulated sugar

1/4 cup (50g) brown sugar

2 large eggs

1 teaspoon vanilla extract

1 1/2 cups (190g) all-purpose flour

1 teaspoon baking powder

1/2 teaspoon baking soda

1/2 teaspoon salt

1/2 teaspoon cinnamon (optional)

1/2 cup (120ml) milk or buttermilk

3/4 cup (130g) chocolate chips

Instructions:

1. Preheat oven to 350°F (175°C). Line a muffin tin with paper liners or grease with oil.

2. Mash the bananas in a bowl until smooth.

3. Mix wet ingredients: In a large bowl, whisk together the mashed bananas, oil (or butter), granulated sugar, brown sugar, eggs, and vanilla extract.

4. Prepare dry ingredients: In another bowl, sift together flour, baking powder, baking soda, salt, and cinnamon.

5. Combine: Gradually add the dry ingredients into the wet ingredients, alternating with milk. Stir until just combined (do not overmix).

6. Add chocolate chips and gently fold them in.

7. Fill muffin cups about 3/4 full with the batter.

8. Bake for 18-22 minutes, or until a toothpick inserted in the center comes out clean.

9. Cool for 5 minutes in the tin, then transfer to a wire rack.

Ingredients

  • Bananas (1 medium): ~0 SmartPoints
  • All-purpose flour (1 cup): ~5 SmartPoints
  • Sugar (1/2 cup): ~10 SmartPoints
  • Butter (1/4 cup): ~8 SmartPoints
  • Eggs (1 large): ~2 SmartPoints
  • Chocolate chips (1/2 cup): ~6 SmartPoints
  • Baking powder, vanilla extract, and salt: 0 SmartPoints

Total Calculation

  1. Total SmartPoints = 0 (banana) + 5 (flour) + 10 (sugar) + 8 (butter) + 2 (egg) + 6 (chocolate chips)
  2. Total SmartPoints = 31 SmartPoints for the entire batch.

Per Muffin Calculation

If the recipe makes 12 muffins:

  • SmartPoints per muffin = Total SmartPoints / Number of muffins
  • SmartPoints per muffin = 31 / 12 ≈ 2.58

Final SmartPoints

  • Rounded SmartPoints per muffin3 SmartPoints

Note

This is a rough estimate. For precise SmartPoints, consider using a nutrition calculator or the Weight Watchers app, as they take into account the specific brands and quantities used.

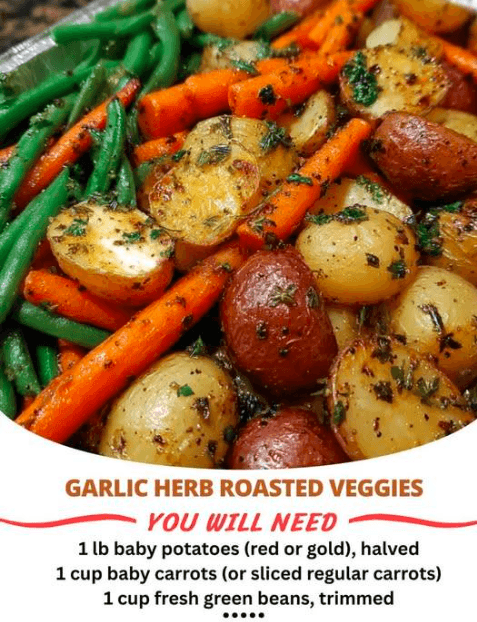
Garlic Herb Roasted Potatoes Carrots and Zucchini

Ingredients :

1 1/4 lb baby potatoes, halved

1 lb medium carrots, scrubbed clean, cut into 2-inch pieces

3 tablespoon olive oil, divided

1 tablespoon minced fresh thyme

1 tablespoon minced fresh rosemary

Salt and freshly ground black pepper

12 oz. zucchini, trimmed and cut into 1-inch pieces

4 cloves garlic, minced

DIRECTIONS :

To make the Garlic Herb Roasted Potatoes Carrots and Zucchini: Preheat your oven to 400ºF (200ºC) and set a rack to the middle. In a large bowl, toss together potatoes carrots with 2 1/2 tablespoons olive oil, thyme, rosemary and season with salt and pepper to taste. Spread onto a rimmed baking sheet—Roast in the preheated oven for 20 minutes.

Toss zucchini in a bowl with the remaining 1/2 tablespoon olive oil and season lightly with salt. Add to the baking sheet with other potatoes and carrots. Add minced garlic and toss everything, and spread into an even layer. Return to oven and roast until all of the veggies are tender and slightly browned, about 20 minutes longer. Serve the Garlic Herb Roasted Potatoes Carrots and Zucchini warm – enjoy

Ingredients

  • ▢Olive oil: 2 tablespoons
  • ▢Potatoes: 2 medium peeled and cubed
  • ▢Garlic: 3 cloves minced
  • ▢Zucchini: 1 large diced
  • ▢Vegetable broth: 6 cups
  • ▢Celery stalks: 2 diced
  • ▢Peas: 1 cup frozen or fresh
  • ▢Canned diced tomatoes: 14.5 ounces 1 can, with juice
  • ▢Bay leaves: 2
  • ▢Dried thyme: 1 teaspoon
  • ▢Green beans: 1 cup trimmed and cut into 1-inch pieces
  • ▢Carrots: 2 large peeled and diced
  • ▢Salt and pepper: to taste
  • ▢Parsley: fresh chopped for garnish
  • ▢Corn: 1 cup frozen or fresh
  • ▢Onion: 1 large diced

Instructions

Sauté the Base Vegetables:

  • In a large pot, heat the olive oil over medium heat. Add the onion, carrots, and celery. Sauté until the vegetables begin to soften, about 5 minutes.
  • Add the minced garlic and cook for another minute until fragrant.

Add the Remaining Vegetables:

  • Stir in the zucchini and green beans. Cook for about 3-4 minutes.
  • Add the canned diced tomatoes with their juice, stirring to combine.

Simmer the Soup:

  • Pour in the vegetable broth and bring the mixture to a boil. Add the cubed potatoes, corn, peas, bay leaves, and dried thyme. Season with salt and pepper to taste.
  • Reduce the heat to a simmer and cover the pot. Let the soup cook for about 20-30 minutes, or until the potatoes are tender.

Final Adjustments:

  • Once the vegetables are all tender, remove the bay leaves. Taste the soup and adjust the seasoning with more salt and pepper if needed.

Serve:

  • Ladle the soup into bowls and garnish with fresh chopped parsley.
  • Serve hot with crusty bread on the side for dipping.

Ingredients You’ll Need

The secret to this dish lies in its simple yet indulgent combination of ingredients. Here’s what you’ll need:

For the Pasta:

  • 8 oz penne pasta (or your favorite shape)
  • 1 lb boneless, skinless chicken breasts or thighs (cut into bite-sized pieces)
  • 2 tablespoons olive oil (divided)
  • Salt and pepper (to taste)

For the Sauce:

  • 1 tablespoon unsalted butter
  • 8 oz cremini or button mushrooms (sliced)
  • 1 bunch asparagus (trimmed and cut into 1-inch pieces)
  • 3 cloves garlic (minced)
  • 1 cup heavy cream
  • ½ cup chicken broth
  • ½ cup grated Parmesan cheese
  • ¼ teaspoon red pepper flakes (optional, for heat)
  • Fresh parsley (chopped, for garnish)

Step-by-Step Instructions

Ready to whip up this creamy, flavorful pasta? Follow these easy steps:

Step 1: Cook the Pasta

  1. Bring a large pot of salted water to a boil. Add the penne and cook according to package instructions until al dente. Reserve ½ cup of pasta water, then drain the pasta and set aside.

Step 2: Cook the Chicken

  1. Heat 1 tablespoon of olive oil in a large skillet over medium-high heat.
  2. Season the chicken pieces with salt and pepper, then add them to the skillet. Cook for 5–7 minutes, stirring occasionally, until golden brown and cooked through. Remove the chicken from the skillet and set aside.

Step 3: Sauté the Vegetables

  1. In the same skillet, heat the remaining 1 tablespoon of olive oil and the butter over medium heat.
  2. Add the sliced mushrooms and cook for 5–6 minutes, until they release their moisture and turn golden brown.
  3. Stir in the asparagus and cook for an additional 3–4 minutes, until tender-crisp.
  4. Add the minced garlic and sauté for 30 seconds to 1 minute, until fragrant.

Step 4: Make the Sauce

  1. Pour in the chicken broth and heavy cream, stirring to combine. Bring the mixture to a gentle simmer.
  2. Stir in the grated Parmesan cheese until melted and the sauce thickens slightly.
  3. If the sauce is too thick, loosen it with a splash of reserved pasta water.

Step 5: Combine Everything

  1. Return the cooked chicken and drained pasta to the skillet, tossing gently to coat everything in the creamy sauce.
  2. Taste and adjust seasoning with additional salt, pepper, or red pepper flakes, if desired.

Step 6: Garnish and Serve

  1. Transfer the pasta to serving plates or a large bowl.
  2. Garnish with fresh parsley and extra Parmesan cheese, if desired.
  3. Serve hot and enjoy the creamy, comforting goodness!

Why This Recipe Works So Well

The magic of Creamy Mushroom and Asparagus Chicken Penne lies in its balance of flavors and textures. The tender chicken provides protein and heartiness, while the mushrooms and asparagus add earthy and fresh notes. The creamy sauce ties everything together with its rich, velvety finish, creating a dish that’s as satisfying as it is indulgent—a true crowd-pleaser.


Variations to Try

While the classic version is divine, here are some creative ways to switch things up:

  1. Add Spinach : Stir in fresh spinach for added greens and nutrients.
  2. Switch the Protein : Use shrimp, sausage, or tofu instead of chicken for a different twist.
  3. Gluten-Free Option : Substitute gluten-free pasta to accommodate dietary restrictions.
  4. Vegan Version : Use plant-based cream, butter, and Parmesan for a dairy-free alternative.
  5. Spice It Up : Add extra red pepper flakes or a dash of hot sauce for a fiery kick.

Tips for Success

  1. Don’t Overcook the Asparagus : Asparagus should be tender-crisp to maintain its vibrant color and texture.
  2. Use Fresh Garlic : Fresh garlic adds more flavor than pre-minced or powdered garlic.
  3. Save Leftovers : Store cooled leftovers in an airtight container in the refrigerator for up to 3 days. Reheat gently on the stovetop with a splash of cream or broth to loosen the sauce.
  4. Freeze for Later : Freeze portions of the dish (without the sauce) for up to 3 months. Add the sauce after reheating.
  5. Experiment with Herbs : Try thyme, basil, or oregano for added depth.

Serving Suggestions

This Creamy Mushroom and Asparagus Chicken Penne is incredibly versatile and pairs well with a variety of occasions. Here are some ideas to enhance your experience:

  • Weeknight Dinner : Serve it alongside garlic bread or a simple green salad for a complete meal.
  • Romantic Dinner : Pair it with a glass of white wine and roasted vegetables for an elegant spread.
  • Holiday Spread : Include it on your Christmas or Easter table for a festive touch.
  • Brunch Addition : Serve smaller portions alongside quiches, frittatas, and fresh fruit.
  • Potluck Favorite : Bring it to gatherings—it’s always a hit with its rich flavors and creamy texture.

Final Thoughts

With its tender chicken, creamy sauce, and fresh vegetables, Creamy Mushroom and Asparagus Chicken Penne is a dish worth making again and again. Whether you’re hosting a gathering, celebrating a special occasion, or simply craving something rich and satisfying, this recipe delivers big on taste and charm.

So, the next time you’re in the mood for something indulgent, flavorful, and utterly satisfying, give this pasta a try. Trust us—it’s quick, easy, and absolutely divine!

Ingredients

Original recipe (1X) yields 12 servings

  • 2 cups white sugar
  • 1 cup butter, softened
  • 2 large eggs
  • 1 cup sour cream
  • 1 teaspoon vanilla extract
  • 1 ⅝ cups all-purpose flour
  • 1 teaspoon baking powder
  • ¼ teaspoon salt
  • 1 cup fresh or frozen blueberries
  • ½ cup brown sugar
  • ½ cup chopped pecans
  • 1 teaspoon ground cinnamon
  • 1 tablespoon confectioners’ sugar for dusting

Directions

  1. Gather the ingredients. Preheat the oven to 350 degrees F (175 degrees C). Grease and flour a 9-inch Bundt pan.
  2. Beat sugar and butter together in a large bowl with an electric mixer until light and fluffy. Add eggs, one at a time, beating well after each addition. Beat in sour cream and vanilla extract. Combine flour, baking powder, and salt; stir into butter mixture until just blended. Fold in blueberries.
  3. Spoon 1/2 of the batter into the prepared pan. Combine brown sugar, pecans, and cinnamon in a small bowl; sprinkle 1/2 of the mixture over batter in the pan. 
  4. Spoon remaining batter on top, then sprinkle over remaining pecan mixture. Use a knife or thin spatula to swirl the sugar layer into the cake.
  5. Bake in the preheated oven until a toothpick inserted into the center comes out clean, about 1 hour to 1 hour 15 minutes. Cool briefly on a wire rack. Invert carefully onto a serving plate; dust with confectioners’ sugar just before serving.
  6. Serve and enjoy!

Weight Watchers Cottage Cheese Cookie Dough
Introduction: Embark on a guilt-free journey of indulgence with our Weight Watchers Cottage Cheese Cookie Dough—a delightful treat that redefines traditional cookie dough with a health-conscious twist. This innovative recipe combines the creamy goodness of cottage cheese with the sweet satisfaction of cookie dough, delivering a wholesome alternative for those on the Weight Watchers plan. From the protein-rich cottage cheese to the balance of sweetness and texture, each element of this recipe is meticulously crafted to provide a delightful guilt-free experience.

Ingredients:
For the Cottage Cheese Cookie Dough:
1 cup low-fat cottage cheese
1/4 cup unsweetened applesauce
2 tablespoons almond butter
2 tablespoons honey or maple syrup
1 teaspoon vanilla extract
1 cup oat flour
1/4 cup almond flour
1/4 cup mini chocolate chips (sugar-free if preferred)
1/4 teaspoon salt
For Optional Toppings:
Crushed nuts (such as almonds or walnuts)
Shredded coconut
Extra mini chocolate chips
Instructions:
Prepare Cottage Cheese Mixture:
In a food processor or blender, combine low-fat cottage cheese, unsweetened applesauce, almond butter, honey or maple syrup, and vanilla extract. Blend until smooth and creamy.
Incorporate Flours:
Add oat flour and almond flour to the cottage cheese mixture, blending until a cookie dough consistency is achieved.
Add Chocolate Chips:
Gently fold in mini chocolate chips and a pinch of salt, distributing them evenly throughout the dough for a burst of sweetness in every bite.
Chill for Firmness:
Transfer the cookie dough to a bowl and refrigerate for at least 30 minutes. This chilling process allows the dough to firm up for easier handling.
Shape into Bite-Sized Pieces:
Once chilled, use a spoon or your hands to shape the cookie dough into bite-sized pieces. Roll them gently between your palms for a smooth finish.
Optional Toppings:
For added texture and flavor, roll the cookie dough bites in crushed nuts, shredded coconut, or extra mini chocolate chips.
Serve and Enjoy:
Arrange the Weight Watchers Cottage Cheese Cookie Dough bites on a serving platter and savor the guilt-free delight.
Storage Tips:
Store any leftover cookie dough bites in an airtight container in the refrigerator for up to a week. These make for a convenient and satisfying snack throughout the week.
Dietary Considerations:
Tailored for those on the Weight Watchers plan, this recipe emphasizes the use of low-fat cottage cheese and mindful sweeteners, providing a delicious treat without compromising on nutritional goals.
Nutritional Information:
Each bite of Weight Watchers Cottage Cheese Cookie Dough offers a harmonious balance of protein, healthy fats, and complex carbohydrates. The inclusion of almond flour and oats contributes to a satisfying and nutrient-rich indulgence.
Health Benefits of Cottage Cheese:
Cottage cheese is not only a versatile ingredient but also a rich source of protein, calcium, and B vitamins. Incorporating it into recipes like this cookie dough provides a nutritious boost to your snack options.
Substitution Options:
Experiment with different nut butters or sweeteners to customize the flavor profile of your cookie dough. Additionally, consider using gluten-free oat flour for those with dietary restrictions.
Kid-Friendly Variation:
Get the little ones involved in the kitchen by allowing them to shape and roll the cookie dough bites. It’s a fun and interactive way to enjoy this wholesome treat as a family.

Balancing Sweetness:
Adjust the sweetness level to your liking by varying the amount of honey or maple syrup. Taste the dough before shaping it into bites to ensure it meets your desired sweetness.
Creative Serving Ideas:
Serve these delightful bites on a dessert platter, as an after-school snack, or even as a healthier alternative at parties. The versatile nature of these cookie dough bites makes them a crowd-pleaser for various occasions.
Conclusion:
Experience the joy of guilt-free indulgence with our Weight Watchers Cottage Cheese Cookie Dough—a delightful fusion of creamy textures and sweet satisfaction. Crafted with mindful choices for those on the Weight Watchers plan, this recipe showcases the versatility of low-fat cottage cheese in creating a delectable treat. Share the delight of these cookie dough bites with family and friends, proving that wholesome choices can be both delicious and satisfying. Revel in the harmonious blend of flavors and textures, making every bite a celebration of health-conscious indulgence in your culinary journey.

WW Crustless Pizza Bowls

Ingredients (Serves 4)

  • 1 lb (16 oz) lean ground turkey or chicken (93% lean) – 0 Points
  • 1 cup low-sugar pizza sauce – 2 Points
  • 1 cup shredded part-skim mozzarella cheese – 4 Points
  • 1/2 cup black olives, sliced – 2 Points
  • 1 cup mixed bell peppers (red, yellow, green), diced – 0 Points
  • 1/4 cup turkey pepperoni slices – 1 Point
  • 1 tsp Italian seasoning – 0 Points
  • 1/4 tsp garlic powder – 0 Points

Instructions

  1. Preheat Oven
    Set your oven to 375°F (190°C).
  2. Cook the Meat
    In a non-stick skillet, brown the ground turkey or chicken over medium heat. Add Italian seasoning and garlic powder for flavor. Cook until no longer pink.
  3. Assemble the Bowls
    Using oven-safe ramekins or aluminum cups, start layering:
    • A few spoonfuls of pizza sauce
    • A generous scoop of cooked turkey
    • Chopped bell peppers and black olives
    • Top with shredded mozzarella and a few slices of turkey pepperoni
  4. Bake
    Place the bowls on a baking tray and bake for 10-12 minutes, or until the cheese is melted, bubbly, and golden brown.
  5. Serve
    Enjoy your crustless pizza bowl warm and fresh out of the oven!

WW Points: 2 points (on most plans)

Ingredients:

  • 1 light or low-carb tortilla or wrap (1 point)
    • Examples: Ole Xtreme Wellness, Tumaro’s 1-Point Wraps, or WW Wraps
  • 1 pouch or can tuna in water (3 oz) – 0 points
  • 1 tbsp fat-free plain Greek yogurt – 0 points
  • 1 tsp light mayonnaise – 0 points
  • 1 tbsp diced pickles or relish – 0 points
  • Dash of Dijon mustard (optional) – 0 points
  • Salt, pepper, garlic powder – to taste
  • 1 slice reduced-fat cheese (like Velveeta or Kraft thin slice) – 1 point
  • Spray of olive oil or butter-flavored nonstick spray – 0 point
  • Instructions:
  • In a bowl, mix tunaGreek yogurtlight mayopicklesmustard, and seasonings.
  • Lay out your low-point wrap. Spoon the tuna mixture down the center.
  • Top with 1 slice of reduced-fat cheese.
  • Fold into a wrap or burrito shape.
  • Spray a skillet with nonstick spray and place the wrap seam-side down.
  • Grill over medium heat for 2–3 minutes per side until golden and the cheese is melted.
  • Total WW Points = 2 points
  • Wrap: 1 point
  • Cheese: 1 point
  • Tuna + yogurt + mayo + pickles = 0 points
  • Tips:
  • Make ahead for meal prep and reheat in an air fryer or pan.
  • Want extra crunch? Add shredded lettuce or cucumbers inside (0 points).
  • Spice it up with red pepper flakes or jalapeños.