Author

Lena Blaze

Browsing

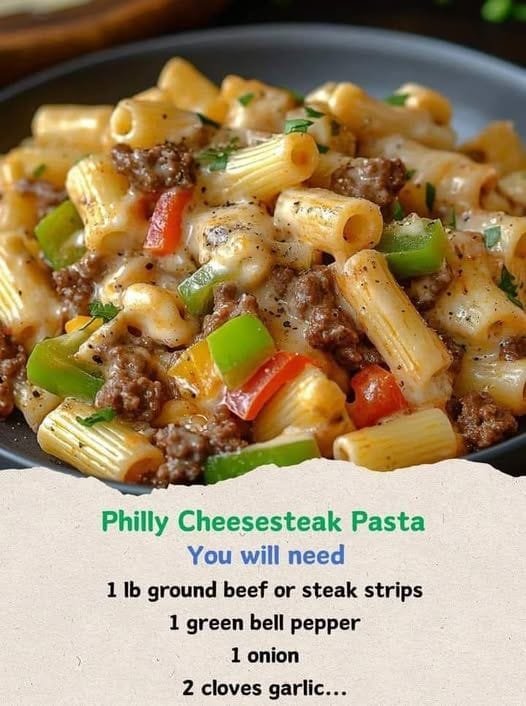
Welcome to a hearty and healthy meal that is perfect for those following the Weight Watchers program. This Weight Watchers-friendly pasta with lean ground beef, sautéed vegetables, and a creamy mozzarella sauce offers an indulgent, flavorful dinner without compromising on your health goals. With a rich mix of whole-grain pasta, lean protein, and a homemade creamy sauce, this recipe combines comfort with nourishment, all while keeping your WW points in check.

Whether you’re cooking for yourself, a family, or meal prepping for the week ahead, this recipe can easily become a go-to favorite. Plus, it’s simple to make, with easy-to-find ingredients and just a few key steps to follow. The rich flavors of bell peppers, onions, and garlic complement the savory beef and melty cheese perfectly, giving you a satisfying and filling meal. The best part? You won’t have to feel guilty about enjoying this dish because it’s made with weight-conscious substitutions that make it lower in calories and Weight Watchers points.

Let’s get started on how to make this creamy, satisfying, and Weight Watchers-approved pasta!


Why This Weight Watchers Pasta Recipe Works

This pasta recipe is not only delicious but also nutritious. By using healthy ingredients like lean ground beefwhole wheat pasta, and unsweetened almond milk, this dish is designed to provide you with a balanced meal that is lower in calories, fats, and carbohydrates compared to traditional pasta recipes. Here’s why this recipe is a great option for your healthy lifestyle:

  • Lean Ground Beef: Opting for 96% lean ground beef or steak strips significantly reduces the fat content, while still providing a good amount of protein. The lean meat keeps the recipe filling and satisfying without being overly greasy or high in calories.
  • Whole-Wheat or Low-Carb Pasta: Whole-wheat pasta is packed with fiber, which helps with digestion and keeps you feeling fuller for longer. If you’re following a low-carb lifestyle, you can substitute regular pasta with a low-carb pasta option like zucchini noodles, shirataki noodles, or any of your favorite alternatives. This keeps the dish light while providing a rich texture.
  • Almond Milk and Reduced-Fat Mozzarella: To keep the sauce creamy yet low in calories, unsweetened almond milk is used as a base. It’s a great non-dairy, low-calorie alternative to regular milk, while still offering that creamy texture. Reduced-fat mozzarella cheese adds flavor without overwhelming the dish with excess fat or calories.
  • Bell Peppers and Onions: These vegetables are packed with essential vitamins, minerals, and antioxidants, adding both flavor and color to the dish. Plus, they provide a natural sweetness when sautéed, helping to balance the savory flavors of the beef and cheese.

By making these smart substitutions, this Weight Watchers pasta recipe maintains the essence of a comforting, indulgent meal, while keeping it light on calories and points.


Ingredients for Weight Watchers Pasta

  • 1 lb lean ground beef (96% lean) or steak strips (alternative for more flavor)
  • 1 green bell pepper, diced
  • 1 red bell pepper, diced
  • 1 medium onion, diced
  • 2 cloves garlic, minced
  • 8 oz whole-wheat or low-carb pasta (such as rigatoni or penne)
  • 1 cup reduced-fat shredded mozzarella cheese
  • 1 cup unsweetened almond milk (or other low-fat milk alternative)
  • 1 tbsp all-purpose flour (for thickening the sauce)
  • Salt and pepper to taste
  • Olive oil spray (for cooking)

Step-by-Step Instructions for Weight Watchers Pasta

Step 1: Boil the Pasta

Start by boiling your pasta according to the package instructions. Be sure to cook it until it’s al dente. After cooking, drain the pasta and set it aside. Make sure to save a small cup of pasta water in case you need it later to thin the sauce.

Step 2: Brown the Lean Ground Beef

While the pasta is cooking, heat a non-stick skillet over medium heat. Spray the skillet with olive oil spray and add your lean ground beef (or steak strips). Cook the meat, breaking it up with a spatula or spoon as it browns. Stir occasionally until the beef is fully cooked and browned. Once done, remove the beef from the skillet and set it aside.

Step 3: Sauté the Vegetables

In the same skillet, add a bit more olive oil spray if necessary. Add the diced green bell pepperred bell pepper, and onion. Sauté for about 5-7 minutes, or until the vegetables become tender and fragrant. Add the minced garlic during the last 2 minutes of sautéing to release its aroma and flavor. The vegetables should be soft and slightly caramelized at this point, providing a rich base for the sauce.

Step 4: Make the Creamy Sauce

In a small bowl, whisk together 1 cup of unsweetened almond milk and 1 tablespoon of flour. This mixture will thicken as it cooks, creating a creamy sauce for the pasta. Pour the almond milk mixture into the skillet with the sautéed vegetables. Stir well and cook the mixture over medium heat, continuing to stir as the sauce thickens. This should take about 3-5 minutes.

Step 5: Combine Beef, Pasta, and Cheese

Once the sauce has thickened to your liking, return the cooked beef to the skillet and stir it into the sauce. Add the drained pasta to the skillet as well, and toss everything together until the pasta is evenly coated in the creamy sauce. Stir in the 1 cup of reduced-fat mozzarella cheese, mixing until the cheese has melted completely and the sauce becomes smooth and creamy. Season with salt and pepper to taste.

Step 6: Serve and Garnish

Serve the pasta warm, garnished with fresh parsley or additional seasonings, if desired. The melted mozzarella cheese creates a creamy texture, while the bell peppers, onions, and beef add a savory balance of flavors. This dish is rich and satisfying, but light enough to stay within your Weight Watchers points.


Nutritional Information (Per Serving)

Here’s the breakdown of the nutrition for one serving of this Weight Watchers pasta recipe. Note that this recipe makes 4 servings.

  • Calories: 350 kcal
  • Protein: 30g
  • Fat: 12g
    • Saturated Fat: 4g
  • Carbohydrates: 36g
    • Fiber: 7g
    • Net Carbs: 29g
  • Sugar: 8g (from vegetables and almond milk)
  • Sodium: 350mg
  • Cholesterol: 45mg
  • Vitamin A: 20% DV
  • Vitamin C: 90% DV (due to the bell peppers)
  • Calcium: 15% DV (from mozzarella cheese)
  • Iron: 15% DV

This Weight Watchers pasta recipe provides a great balance of proteinfiber, and healthy fats, while still being a low-calorie, high-nutrient meal that won’t break your point budget.


Weight Watchers Points Breakdown (Per Serving)

For those following the Weight Watchers program, here’s how this pasta recipe stacks up in terms of points:

  • WW Freestyle: 7 points per serving
  • WW Green: 7 points per serving
  • WW Blue: 7 points per serving
  • WW Purple: 7 points per serving

Each serving is relatively moderate in points, which makes it an ideal choice for a hearty meal that doesn’t derail your WW goals. It is also customizable, as you can adjust the pasta portion size, lean meat, or even add extra veggies to further reduce the points.


Storage Tips

If you have leftovers, store them in an airtight container in the refrigerator for up to 3 days. You can easily reheat this dish in the microwave or on the stovetop. If the sauce has thickened too much, just add a splash of almond milk or water to thin it out.

This dish can also be frozen for longer storage. To freeze, allow it to cool completely, then transfer it to a freezer-safe container. When ready to eat, thaw overnight in the refrigerator and reheat thoroughly.


Customizing This Recipe

  1. Vegetarian Version: Swap out the ground beef for lentilstofu, or chickpeas for a vegetarian version. These plant-based proteins are high in fiber and will keep the dish filling and satisfying.
  2. Dairy-Free: Use a dairy-free cheese alternative in place of the reduced-fat mozzarella, and ensure that your almond milk is unsweetened.
  3. Low-Carb: If you prefer to make this dish low-carb, swap the whole-wheat pasta for zucchini noodles or another low-carb pasta alternative. You can also use a smaller amount of pasta for fewer carbs and bulk up the dish with additional veggies.

Conclusion

This **Weight Watchers Pasta with Lean Beef and Creamy Mozzarella

🕒 Prep Time: 15 minutes

Cook Time: 25 minutes

🍽 Servings: 4

Low-Point Pineapple Chicken and Rice

Ingredients:

  • 1 lb boneless, skinless chicken breasts, diced
  • 1 cup pineapple chunks, fresh or canned in  juice (drained)
  • 1 cup diced bell peppers (any color)
  • 1 cup diced onion
  • 2 cloves garlic, minced
  • 1 cup uncooked brown rice
  • 2 cups low-sodium chicken broth
  • 1 tablespoon reduced-sodium soy sauce
  • 1 tablespoon rice vinegar
  • 1 teaspoon ground ginger
  • 1/2 teaspoon black pepper
  • Cooking spray
  • Chopped green onions or cilantro for garnish (optional)

Instructions:

  1. In a large skillet or Dutch oven, lightly coat with cooking spray and heat over medium-high heat. Add the diced chicken and cook until browned and cooked through, about 5-7 minutes.
  2. Remove the cooked chicken from the skillet and set aside. In the same skillet, add a little more cooking spray if needed, then add the diced bell peppers, onion, and minced garlic. Cook until the vegetables are tender, about 5 minutes.
  3. Stir in the uncooked brown rice, chicken broth, soy sauce, rice vinegar, ground ginger, and black pepper. Bring to a boil, then reduce heat to low, cover, and simmer for 30-35 minutes, or until the rice is cooked and most of the liquid is absorbed.
  4. Once the rice is cooked, add the cooked chicken back to the skillet along with the pineapple chunks. Stir to combine and heat through for another 2-3 minutes.
  5. Remove from heat and let sit for a few minutes before serving. Garnish with chopped green onions or cilantro if desired.
  6. Serve warm and enjoy your low-point Pineapple Chicken and Rice!

Nutrition Information (per serving, makes about 4 servings):

  • Calories: 320 kcal
  • Total Fat: 3g
  • Saturated Fat: 1g
  • Cholesterol: 65mg
  • Sodium: 350mg
  • Total Carbohydrates: 44g
  • Dietary Fiber: 4g
  • Sugars: 10g
  • Protein: 28g

Now, we’ll sum up the Points values for all the recipe..

(Points for chicken + pineapple + bell peppers + onion + garlic + chicken broth + soy sauce + rice vinegar + ginger + black pepper)Total Points = \text{(Points for chicken + pineapple + bell peppers + onion + garlic + chicken broth + soy sauce + rice vinegar + ginger + black pepper)}Total Points=(Points for chicken + pineapple + bell peppers + onion + garlic + chicken broth + soy sauce + rice vinegar + ginger + black pepper)

Total Points=(0+0+0+0+0+0+0+0+0+0)+(6)Total Points = (0 + 0 + 0 + 0 + 0 + 0 + 0 + 0 + 0 + 0) + (6)Total Points=(0+0+0+0+0+0+0+0+0+0)+(6)

Low-Point Pineapple Chicken and Rice

Introduction:

Indulge in a delightful culinary journey with our Low-Point Pineapple Chicken and Rice recipe, carefully crafted to tantalize your taste buds while keeping your health goals in check. Bursting with vibrant flavors and wholesome ingredients, this dish offers a perfect balance of protein, fiber, and essential nutrients, making it an ideal choice for a satisfying meal any day of the week.

Ingredients:

  1. Boneless, Skinless Chicken Breasts: Lean and protein-packed, chicken breasts form the hearty foundation of this dish, providing essential amino acids for muscle health and satiety.
  2. Pineapple Chunks: Adding a tropical twist, juicy pineapple chunks lend a sweet and tangy flavor profile, complementing the savory notes of the chicken and rice.
  3. Bell Peppers and Onion: Vibrant bell peppers and aromatic onion contribute texture, color, and a subtle hint of sweetness to the dish, enhancing its visual appeal and nutritional value.
  4. Garlic: Fragrant garlic infuses the dish with its distinctive aroma and flavor, elevating the overall taste profile and offering potential health benefits, including immune support and heart health.
  5. Uncooked Brown Rice: Nutrient-dense and rich in fiber, brown rice serves as the wholesome base of this recipe, providing sustained energy and promoting digestive health.
  6. Low-Sodium Chicken Broth: Adding depth and richness to the dish, low-sodium chicken broth serves as the flavorful cooking medium, infusing the rice and chicken with savory goodness without excess sodium.
  7. Reduced-Sodium Soy Sauce: Enhancing the umami factor, reduced-sodium  soy sauce lends depth of flavor and a subtle salty note, balancing the sweetness of the pineapple and vegetables.
  8. Rice Vinegar: Bright and tangy, rice vinegar contributes acidity and complexity to the dish, harmonizing the various flavors and imparting a refreshing zest.
  9. Ground Ginger and Black Pepper: Aromatic ground ginger and zesty black pepper add warmth and depth to the dish, infusing it with subtle yet distinct nuances of flavor.

Instructions:

  1. Prepare the Chicken: In a large skillet or Dutch oven, lightly coat with cooking spray and heat over medium-high heat. Add the diced chicken and cook until golden brown and cooked through, approximately 5-7 minutes. Remove the cooked chicken from the skillet and set aside.
  2. Sauté the Vegetables: In the same skillet, add a little more cooking spray if needed, then add the diced bell peppers, onion, and minced garlic. Sauté until the vegetables are tender and fragrant, about 5 minutes.
  3. Cook the Rice: Stir in the uncooked brown rice, low-sodium chicken broth, reduced-sodium soy sauce, rice vinegar, ground ginger, and black pepper. Bring the mixture to a boil, then reduce the heat to low, cover, and simmer for 30-35 minutes, or until the rice is cooked and most of the liquid is absorbed.
  4. Combine the Ingredients: Once the rice is cooked, add the cooked chicken back to the skillet along with the pineapple chunks. Stir to combine and heat through for another 2-3 minutes, allowing the flavors to meld together beautifully.
  5. Garnish and Serve: Remove the skillet from the heat and let the dish sit for a few minutes to allow the flavors to develop. Garnish with chopped green onions or cilantro for a burst of freshness and color. Serve warm and enjoy the delightful fusion of flavors and textures in every bite.

Nutrition Information:

Per Serving (Makes about 4 servings):

  • Calories: 320 kcal
  • Total Fat: 3g
  • Saturated Fat: 1g
  • Cholesterol: 65mg
  • Sodium: 350mg
  • Total Carbohydrates: 44g
  • Dietary Fiber: 4g
  • Sugars: 10g
  • Protein: 28g

Conclusion:

Elevate your dining experience with our Low-Point Pineapple Chicken and Rice recipe, meticulously designed to satisfy your cravings for flavor and nutrition. Whether you’re seeking a wholesome weeknight meal or planning a special dinner with loved ones, this delightful dish promises to delight your palate and nourish your body, one delicious bite at a time. Embrace the culinary magic of fresh ingredients, vibrant flavors, and wholesome goodness, and embark on a culinary adventure that’s both delicious and nutritious.

Sure! Here’s a Weight Watchers–friendly version of Chicken Salad on Croissants, rewritten to lower the points while keeping it delicious — plus full nutrition information and estimated WW points.

🥗 Light Chicken Salad on Croissants (WW-Friendly!) 🥐💙
Enjoy this lightened-up chicken salad packed with flavor and served on a low-point alternative to traditional croissants. Perfect for lunch, meal prep, or a light dinner — all while staying on track with your WW goals!

🕒 Prep Time: 10 minutes

🍽 Servings: 4

WW Points: ~5–6 points per sandwich (varies by bread option)

🧾 Ingredients:

  • 2 cups cooked skinless chicken breast, shredded or diced
  • ¼ cup plain nonfat Greek yogurt
  • 2 tablespoons light mayonnaise (e.g., Hellmann’s Light or similar)
  • 1 teaspoon Dijon mustard
  • 1 stalk celery, finely diced
  • 2 tablespoons red onion, finely diced
  • Salt and pepper, to taste
  • 1 teaspoon lemon juice
  • Optional: fresh parsley or dill for flavor

🥐 Serving Option (Low-Point “Croissant”):

Instead of a traditional croissant (which can be 8–12 points), use:

  • Light hamburger bun (e.g., Healthy Life – 2–3 points)
  • Low-calorie tortilla (e.g., Ole Extreme Wellness Wrap – 1 point)
  • Or serve open-faced on light toast for fewer points!

🥣 Instructions:

  1. In a medium bowl, combine Greek yogurt, light mayo, mustard, lemon juice, and a pinch of salt & pepper.
  2. Stir in the chicken, celery, red onion, and optional herbs.
  3. Mix until well combined and creamy. Chill for 10–15 minutes if time allows.
  4. Serve on your low-point bread option and enjoy!

💡 WW Point Breakdown (per sandwich with wrap or light bun):

IngredientPoints
Chicken breast (½ cup)0
Greek yogurt (1 tbsp)0
Light mayo (½ tbsp)1
Celery/onion/mustard0
Low-point bun/wrap1–3
Total (approx.):2–4 WW Points

🍽 Nutrition (Estimated per sandwich, with wrap):

  • Calories: ~200
  • Protein: ~25g
  • Carbs: ~10–12g
  • Fat: ~6g
  • Sugar: ~1g
  • Fiber: ~4g

💬 This lightened chicken salad is super satisfying and can be prepped ahead for the week! Serve with fruit, veggie sticks, or a light soup for a complete low-point meal.

#WWChickenSalad #LowPointLunch #WeightWatchersRecipes #HealthySwaps #MealPrepFriendly

Absolutely! Here’s a long-form, detailed version of your Apple Oat Muffins recipe, complete with instructions, WW point estimates per muffin, and helpful tips—perfect for sharing in your Facebook group or as a printable post.

🧁🍎 Healthy Apple Oat Muffins (Weight Watchers Friendly – 3–5 Points ) 🍎🧁!

📋 Recipe Details:

  • Yield: 12 standard-size muffins
  • Prep Time: 10 minutes
  • Cook Time: 20–25 minutes
  • WW Points per muffin: Approx. 3–5 points (based on Blue plan)

🧾 Ingredients:

  • 1 ½ cups rolled oats (Use quick oats if needed)
  • 150 ml warm milk (can use almond, skim, or oat milk)
  • 2 medium apples, peeled, cored, and grated or finely chopped
  • 2 tablespoons unsalted butter or light margarine, melted
  • 2 large eggs
  • 1 teaspoon vanilla extract
  • ½ cup chopped walnuts or almonds
  • ½ teaspoon cinnamon (optional, but recommended!)
  • 1 teaspoon baking powder
  • Pinch of salt
  • Non-stick spray or a little vegetable oil for greasing the pan

🥣 Instructions:

  1. Preheat oven to 350°F (175°C). Lightly grease a muffin tin with vegetable oil or nonstick spray.
  2. In a large mixing bowl, combine the rolled oats and warm milk. Let it sit for about 5–10 minutes to soften the oats.
  3. While oats soak, grate or finely chop the apples. Set them aside.
  4. To the oat mixture, add the eggs, vanilla extract, melted butter, and a pinch of salt. Mix well.
  5. Stir in the apples, chopped nuts, baking powder, and cinnamon (if using). Mix until everything is well incorporated.
  6. Divide the batter evenly between the 12 muffin cups.
  7. Bake for 20–25 minutes, or until the tops are golden and a toothpick inserted in the center comes out clean.
  8. Allow to cool in the pan for 5 minutes before transferring to a wire rack to cool completely.

🍏 WW Point Breakdown (Per Muffin):

IngredientPoints (Approx.)
Rolled oats1 point
Butter/margarine1–2 points
Chopped nuts1–2 points
Apples, eggs, milk, etc.0 points
Estimated Total:3–5 points

👏 These muffins are WW-friendly, freezer-friendly, and 100% delicious.

#WWRecipes #WeightWatchersFriendly #AppleOatMuffins #LowPointSnack #MealPrepIdea

🧁🍎 Healthy Apple Oat Muffins

Ingredients:

    • 1 cup (100 g) oatmeal
    • ½ cup (120 ml) milk of your choice (e.g., almond milk, cow’s milk, etc.)
    • 2 apples, peeled, cored, and chopped
    • 1 tbsp butter
    • 1 tsp vanilla extract
    • A pinch of salt
  • 2 eggs
  • ¼ cup (30 g) walnuts, chopped

Instructions:

    1. Prepare the Oats:
      • In a bowl, combine the oatmeal with the milk of your choice. Let it sit for about 5-10 minutes, allowing the oats to absorb the milk and soften.
    2. Cook the Apples:
        • In a medium skillet, melt 1 tablespoon of butter over medium heat.
      • Add the chopped apples and sauté for about 10 minutes, or until the apples are soft and slightly caramelized. Stir in a pinch of salt and vanilla extract for added flavor.
    3. Prepare the Muffin Mixture:
        • Preheat your oven to 360°F (180°C).
      • In a large bowl, whisk the eggs. Add the softened oatmeal mixture, cooked apples, and chopped walnuts. Stir everything until well combined.
    4. Bake the Muffins:
        • Grease a muffin tin or line it with paper liners.
      • Evenly divide the muffin mixture among the prepared cups.
      • Bake in the preheated oven for 20-25 minutes, or until the muffins are golden brown and a toothpick inserted into the center comes out clean.
  1. Cool and Serve:
    • Let the muffins cool in the tin for a few minutes before transferring them to a wire rack to cool completely.

Serving Suggestions:

  • Serve the muffins warm with a pat of butter or drizzle of honey for extra sweetness.
  • They make a great on-the-go breakfast or snack option.

Cooking Tips:

    • For added flavor, sprinkle cinnamon or nutmeg into the muffin batter.
    • You can substitute walnuts with other nuts like almonds or pecans.
    • Make these muffins dairy-free by using plant-based butter and milk.

See alsoDelightful Tuna Pasta Salad Recipe

Nutritional Benefits:

    • Oatmeal is a great source of fiber, which aids digestion.
    • Apples are rich in vitamins and antioxidants.
  • Walnuts provide healthy fats and protein, adding a satisfying crunch.

Dietary Information:

    • This recipe is naturally vegetarian.
  • To make it gluten-free, use certified gluten-free oats.

Storage Information:

    • Refrigerator: Store any leftover muffins in an airtight container in the fridge for up to 3 days.
  • Freezing: You can freeze these muffins for up to 1 month. Simply reheat in the oven or microwave when ready to eat.

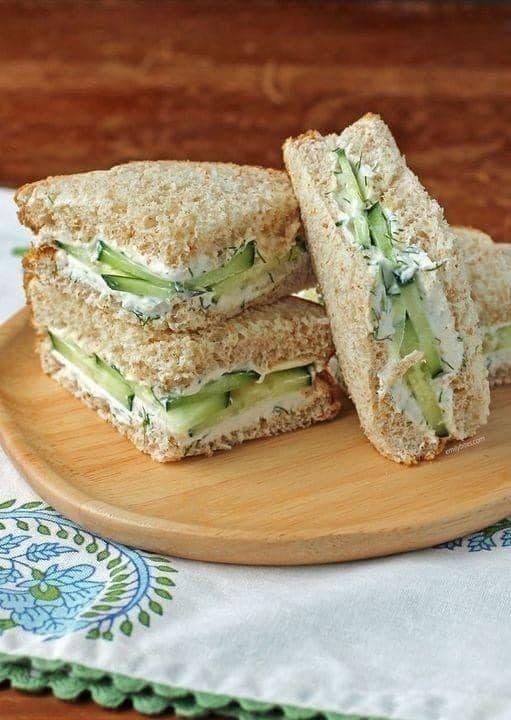
These classic Cucumber Sandwiches are a fresh and tasty vegetarian lunch option that comes together in minutes!

prep time: 5 MINS

total time: 5 MINS

calories: 240KCAL

yield: 2 SANDWICHES

Ingredients

  • 2 oz 1/3 less fat cream cheese, softened to room temperature
  • 2 tablespoons plain nonfat Greek yogurt
  • 2 teaspoons chopped fresh dill
  • 1 teaspoon lemon juice
  • 1/8 teaspoon salt
  • 1/8 teaspoon black pepper
  • 4 slices soft wheat bread, (I used Wegmans soft 100% Whole Wheat Bread)
  • ½ a fresh cucumber, thinly sliced

Instructions

  • In a small mixing bowl, combine the cream cheese, yogurt, dill, lemon juice, salt, and pepper and stir together until mixed.
  • Use a silicone spatula or butter knife to divide the cream cheese mixture into four equal sections. Spread a section of cream cheese mix across the surface of each slice of bread so that all four slices have cream cheese mix on one side. Lay cucumber slices over the cheesy surface of two of the slices of bread and cover with the remaining slices so that the cucumber layer has cream cheese on both sides. Cut the sandwich into quarters or “fingers (rectangles) and serve.

Notes

W-W Points per sandwich: 8 

Nutrition Information per sandwich:

🥗 Nutrition Information (Per Sandwich):

  • Calories: 240
  • Total Fat: 7g
  • Saturated Fat: 3g
  • Cholesterol: 20mg
  • Sodium: 390mg
  • Total Carbohydrates: 32g
  • Dietary Fiber: 4g
  • Sugars: 4g
  • Protein: 11g

#CucumberSandwiches #WeightWatchersRecipes #LowPointLunch #HealthyEating #WWFriendly #FreshAndEasy

🍋💙 Light & Zesty Lemon Blueberry Donuts – Just 1 WW SmartPoint Each! 💙🍋
Baking that satisfies your sweet tooth without derailing your journey? YES PLEASE! 🙌
If you’re craving something sweet, fruity, and guilt-free, these donuts are about to become your new favorite treat!


🧁 What Makes These So Amazing?

✅ Only 1 SmartPoint per donut
✅ No eggs, oil, or butter needed!
✅ Super easy 3-ingredient recipe
Kid-approved, party-worthy, and WW-friendly!


📝 Ingredients (just 3!)

  • 1 box of Lemon Cake Mix 🍋 (sugar-free if available for fewer points)
  • 1 can of Sprite Zero 🥤 (or any zero-calorie lemon-lime soda)
  • A handful of fresh blueberries 🫐

🔥 Directions:

1️⃣ Preheat your oven to 350°F (175°C).
2️⃣ In a bowl, mix the dry cake mix with the Sprite Zero. It’ll get light and frothy—don’t overmix!
3️⃣ Spray your donut pan with nonstick spray (this step matters—no one likes sticky donuts!).
4️⃣ Spoon the batter into each donut mold, filling about ¾ full.
5️⃣ Drop 3–5 blueberries into each donut for a pop of color and flavor.
6️⃣ Bake for 15–25 minutes depending on your pan size.
Mini donut pans take ~15 min; full-size may take longer.
7️⃣ Let them cool completely before removing from the pan—trust me, they hold their shape better once cooled!


👩‍🍳 Tips & Variations:

  • Add a light dusting of powdered sugar or drizzle with a sugar-free glaze (optional – adjust points!).
  • Try using raspberries or chopped strawberries for a fun twist.
  • Store in the fridge for up to 3 days or freeze for a longer shelf life.

🎉 Why You’ll Love Them:

A great way to stay on track without sacrificing taste.

Perfect for meal prep, brunch, or a light after-dinner sweet.

Great to bring to parties—you’ll be the hero who brought the “healthy donuts”!

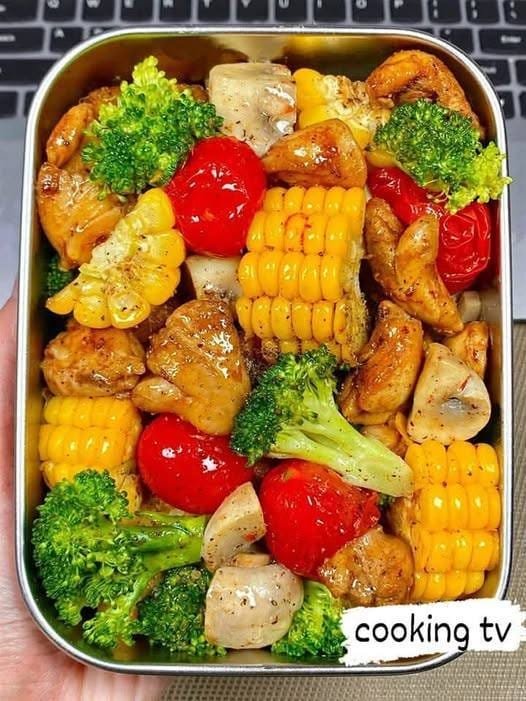
Delicious Chicken,  Broccoli, and  Corn Skillet Recipe ( Weight Watchers Friendly)
Serves: 4 | WW SmartPoints: 2 per serving (on the Blue plan)
Calories per serving: 150 | Protein: 25g | Carbs: 10g | Fat: 5g

If you’re looking for a healthy, satisfying, and easy-to-make meal, this Chicken, Broccoli, and Corn Skillet is a perfect option. It’s a balanced dish, combining lean protein from the chicken, fiber and nutrients from the broccoli, and a touch of sweetness from the corn and cherry tomatoes. Plus, it’s completely Weight Watchers-friendly, so you can enjoy a flavorful meal without worrying about the points
This recipe is not only delicious but also packed with nutrients that will fuel your body. Whether you’re on the Weight Watchers program or just looking for a healthier option, this dish can be your go-to for a quick weeknight dinner. The recipe can be prepared in about 30 minutes and is easy to modify based on your dietary preferences.

Ingredients:
2 chicken breasts, diced (about 12 oz total)
2 cups broccoli florets
1 cup corn (fresh, frozen, or canned)
1 cup cherry tomatoes, halved
2 tablespoons olive oil (use a spray for lower fat)
2 cloves garlic, minced
1 teaspoon Italian seasoning (or your preferred blend of herbs)
Salt and pepper to taste
Optional: Grated Parmesan cheese for topping (can be omitted for lower points)
Nutrition Information (Per Serving):

Calories: 150
Fat: 5g
Carbohydrates: 10g
Protein: 25g
Fiber: 3g
WW SmartPoints: 2 (Blue plan)
Step-by-Step Instructions:

  1. Cook the Chicken:
    Start by preparing the chicken. Diced chicken breasts cook quickly and are a great lean protein option. Heat a large skillet over medium heat and add 1 tablespoon of olive oil. Season the chicken with salt, pepper, and Italian seasoning. Once the pan is hot, add the chicken pieces and sauté for about 5-7 minutes, stirring occasionally. Cook until the chicken is browned on all sides and fully cooked through. You’ll know the chicken is ready when it reaches an internal temperature of 165°F (75°C). Once done, remove the chicken from the skillet and set it aside on a plate.

Pro Tip: To make this even lighter, you can use a non-stick spray in place of olive oil to reduce the fat content while still getting great flavor from the chicken.

  1. Sauté the Vegetables:
    In the same skillet, add the remaining tablespoon of olive oil (or spray to keep it lighter). Heat over medium-high and toss in the minced garlic. Sauté for about 30 seconds, just long enough to release the garlic’s aromatic fragrance. Next, add the broccoli florets and corn to the skillet. Stir occasionally and cook for about 5 minutes. The goal is to keep the broccoli slightly crisp while making sure it softens enough to be tender. The corn will begin to soften and caramelize slightly, adding a sweet flavor to the dish.

Pro Tip: For a more intense flavor, try roasting the broccoli and corn in the oven first. Toss the vegetables in a little olive oil and season them with salt, pepper, and garlic powder, then roast at 425°F for 15-20 minutes before adding to the skillet.

  1. Add Tomatoes:
    Once the broccoli and corn are cooked, add the halved cherry tomatoes to the pan. Stir them in gently, and cook for an additional 2-3 minutes until the tomatoes are just softened. This will release their juices and add a nice contrast to the other ingredients. Tomatoes are rich in antioxidants, particularly lycopene, which is known for its heart-healthy properties.

Pro Tip: Cherry tomatoes cook quickly, so don’t overcook them. The goal is to soften them just a bit while keeping them vibrant and fresh.

  1. Combine Everything:
    Once the  vegetables are cooked to your desired tenderness, return the cooked chicken to the skillet. Toss everything together gently, ensuring the chicken is evenly distributed among the vegetables. Allow the mixture to cook for another minute or so, just long enough for everything to heat through and meld together. Taste the dish and adjust the  seasoning with additional salt or pepper if needed.

Pro Tip: Feel free to mix in a splash of chicken broth or a squeeze of lemon juice to add more moisture and depth of flavor without adding extra points.

  1. Serve:
    Once the dish is ready, remove it from the heat and serve hot. You can sprinkle a small amount of grated Parmesan  cheese on top for added flavor. A tablespoon of Parmesan will only add 1-2 points depending on how much you use, but if you want to keep the points lower, it’s optional. The dish is satisfying as is, but a sprinkle of cheese can elevate the flavor.

Pro Tip: If you’re looking to increase the volume of your meal without adding many points, serve it with a side of cauliflower rice or a small portion of whole grains like quinoa or brown rice.

Additional Tips and Information:

  1. Customizing the Recipe:
    One of the great things about this recipe is its versatility. If you’re not a fan of one of the ingredients, feel free to swap it out for something else. For example, you can substitute the corn with peas or even zucchini for a different flavor and texture. You can also use different types of seasoning to match your preferences, such as swapping Italian seasoning for garlic powder, oregano, or herbes de Provence.
  2. Nutritional Benefits:
    This meal is low in calories, high in protein, and rich in vitamins and minerals, especially vitamin C from the broccoli and tomatoes. It’s also a good source of fiber, which can help with digestion and keep you feeling full longer. The inclusion of lean chicken breast helps keep the fat content low while providing a substantial amount of protein.
  1. Ideal for Meal Prep:
    This recipe works great for meal prep. You can prepare everything ahead of time and store it in the fridge for up to 3 days. Simply reheat the mixture in a skillet or microwave when you’re ready to eat. This makes it an excellent option for busy workdays or school lunches.
  2. Low Carb and Keto-Friendly:
    If you’re following a low-carb or keto diet, this dish fits well into your eating plan. You can skip the corn for fewer carbs and enjoy the healthy fats and protein from the chicken and olive oil. This will make it an even lower-carb alternative.
  3. Dairy-Free Option:
    If you’re following a dairy-free or vegan diet, this recipe is easy to adapt. Simply skip the Parmesan cheese and make sure the chicken is replaced with a plant-based protein, such as tofu, tempeh, or even chickpeas.
  4. How to Reduce Points Further:
    To make this recipe even more Weight Watchers-friendly, consider using non-stick spray instead of olive oil to reduce fat and points. Additionally, you can cut down on the amount of Parmesan or omit it completely to keep the points lower.
  5. Pairing Suggestions:
    To complete your meal, consider pairing this dish with a side salad or a small serving of whole-grain bread. A fresh green salad with a light vinaigrette can help balance the flavors while keeping the meal light and healthy.
  6. The Importance of Portion Control:
    Though this dish is low in points, it’s still important to watch your portions. A serving size of about one-fourth of the skillet (around 1 ½ cups) is ideal for most people. If you’re looking to keep things within your points, be mindful of your portion size when serving.
  7. Storage and Leftovers:
    Leftovers from this recipe store well in the fridge for up to 3 days. For best results, store in an airtight container. If you’d like to freeze it, the dish can be frozen for up to 1 month. Just be sure to cool it completely before freezing, and reheat thoroughly when you’re ready to enjoy it again.

Conclusion:
This Chicken,  Broccoli, and  Corn Skillet is an excellent, low-point recipe that delivers on flavor, nutrition, and versatility. It’s perfect for those following the Weight Watchers program or anyone looking to maintain a healthy diet without sacrificing taste. Whether you’re cooking for yourself or your family, this meal will satisfy hunger and keep you on track with your health goals.

By combining lean protein, fiber-rich  vegetables, and healthy fats, this dish provides a balanced, nourishing meal that supports a healthy lifestyle. The quick preparation time makes it ideal for busy weeknights, while its customizable nature allows it to fit various dietary preferences.

Try it out today and see why this is quickly becoming a favorite for those seeking quick, nutritious meals that won’t break the calorie bank!

Weight Watchers Pizza Muffins

Weight Watchers Pizza Muffins are mouth-watering and tasty. It’s a tempting appetizer. This recipe is easy to make. It’s a Weight Watchers-friendly recipe. It contains only 2 Weight Watchers Points. These fluffy, tasty Weight Watchers pizza muffins will not affect your weight. It’s one serving that is fulfilling and also satisfies your cravings. It’s perfect for lunches or parties.

Why do people love these mini pizzas?

People like these Weight Watchers mini pizzas because.
Easy-to-go recipe
Kids’ favourite lunch meal
Low in calories. It contains only 33 calories.
Will not affect your weight
Ingredients
Flour 3/4 cup
Baking Powder 1tsp
Garlic powder 1/4tsp
Black pepper 1/4tsp, add according to taste
Salt 1/4tsp, add according to taste
Milk 3/4 cup
Grated cheese 1 tbsp, use parmesan cheese, or cheddar cheese
Mozzarella cheese 1/3cup used fat-free cheese
Asiago cheese 1/4 cup, grated
Low Point Bacon 3 slices
Pepperoni 20 slices
Dried oregano 2tsp
Eggs 8
Instructions
To make Weight Watchers Pizza Muffins, follow some steps.
First, adjust the oven temperature to 375 degrees.
Next, spray the baking tray with oil. Set aside the muffin tray.
Now, take a bowl. Add milk, and egg together. Whisk it until it combines.
Set aside this bowl.
Add flour, garlic, salt, pepper, baking powder, oregano, and Italian seasoning in the second bowl.
Combine all ingredients.
Now, mix the dry ingredients with the egg and milk mixture.
Add all cheese to this mixture. Combine it well.
Next, cut the pepperoni and cooked bacon into small bite sizes.
Mix into the batter mixture.
Now, add pizza muffin batter to a baking tray.
To enhance the flavour, top it with Italian seasoning.
Bake pizza muffins for 20- 25 minutes, or until the muffins are crunchy and brown.
The Weight Watchers Pizza Muffins are ready to eat and serve.
Serve mini muffins with marinara sauce, and ketchup.

  • Points per muffin: 2 WW points
  • Points per 2 muffins: 4 WW points

Tips

To enhance the flavours, add any kind of seasoning.
Don’t over-whisk the ingredients.
For baking, measure all ingredients through a measuring cup.
Notes

You can add an extra 1 cup of milk, and baking powder as an alternative to eggs.
If you don’t want to add pepperoni, replace it with ground turkey spiced with dried sage.
You can customize pizza according to your choice, and taste.

Certainly! Here’s a comprehensive, professional rewrite of the recipe, optimized for Weight Watchers, complete with detailed instructions and nutritional information. This rewrite is designed to be informative and suitable for a website.

Weight Watchers-Friendly Cinnamon Apple Bake
Introduction
Welcome to a healthier take on a classic comfort dish: Cinnamon Apple Bake! This revised recipe offers the warm, indulgent flavors of cinnamon rolls and apple pie filling in a lighter, Weight Watchers-friendly version. Ideal for breakfast, brunch, or a cozy dessert, this dish retains all the deliciousness of the original while being mindful of your health goals. Below, you’ll find a thorough, step-by-step guide, including SmartPoints information, nutritional facts, and practical tips to make this recipe a staple in your healthy eating plan.

Ingredients:

2 cans of reduced-fat cinnamon rolls (quarter each roll): Opting for reduced-fat cinnamon rolls helps to cut down on calories and fat. The cinnamon rolls provide a familiar, comforting base for the dish.
1 can apple pie filling (light or reduced-sugar): Using a light or reduced-sugar version of apple pie filling lowers the overall sugar content while still delivering that sweet, fruity flavor.
1/2 cup chopped walnuts or pecans (optional): Nuts add a delightful crunch and a touch of richness. Choose walnuts or pecans based on preference. For a lighter option, consider reducing the quantity or using just a sprinkle.
Non-stick cooking spray: To prevent sticking and ensure easy removal, lightly spray the baking dish with non-stick cooking spray.
Instructions:

Preheat the Oven: Begin by preheating your oven to 350°F (175°C). Properly preheating ensures that your bake cooks evenly and achieves the desired texture.
Prepare the Baking Dish: Lightly spray a 9×13-inch baking dish with non-stick cooking spray. This helps to prevent the cinnamon rolls and apple pie filling from sticking to the dish, making cleanup easier and ensuring your bake comes out perfectly.
Quarter the Cinnamon Rolls: Open the cans of reduced-fat cinnamon rolls and carefully quarter each roll. This means cutting each roll into four smaller pieces. Quartering the rolls helps them to cook more evenly and distribute throughout the dish.
Mix the Ingredients: In a large mixing bowl, combine the quartered cinnamon rolls, apple pie filling, and chopped nuts (if using). Gently fold the ingredients together to ensure that the cinnamon rolls are well coated with the apple pie filling.
Transfer to Baking Dish: Pour the mixture into the prepared baking dish, spreading it out evenly. This ensures that each serving will have a balanced amount of cinnamon rolls, apple filling, and nuts.
Bake: Place the baking dish in the preheated oven and bake for 30-35 minutes. Check for doneness by inserting a toothpick into the center of the bake. It should come out clean, and the top should be golden brown.
Cool Slightly: Allow the bake to cool in the dish for about 10 minutes before serving. This helps the dish set and makes it easier to cut into portions.
Serve: Cut into 12 servings and serve warm. This dish is great on its own or with a dollop of low-fat yogurt for added creaminess.
Nutritional Information & SmartPoints Calculation:

Servings: 12
Calories per serving: Approximately 200
Smart Points per serving: 6

Nutritional Breakdown:

Fat: Reduced due to the use of reduced-fat cinnamon rolls and light apple pie filling.
Protein: Minimal, primarily from the nuts.
Fiber: Beneficial from the apple filling and nuts, which can aid in digestion and contribute to overall satiety.
Health Benefits:

Lower Fat Content: By using reduced-fat cinnamon rolls and light apple pie filling, this recipe lowers the fat content while maintaining a rich flavor profile.
Reduced Sugar: The use of light or reduced-sugar apple pie filling helps to keep the sugar content in check, aligning with Weight Watchers guidelines.
Nuts for Added Texture: Chopped walnuts or pecans provide a satisfying crunch and contribute healthy fats, which are essential for a balanced diet.
Portion Control: By cutting the bake into 12 servings, you can easily manage portion sizes, making it easier to stay within your SmartPoints target.
Tips for Success:

Cinnamon Roll Variations: If you prefer a different flavor, look for reduced-fat options that feature other spices or fruit fillings, but be sure to adjust the SmartPoints accordingly.
Serving Suggestions: This bake pairs well with a side of fresh fruit or a light yogurt. For an extra touch, consider adding a sprinkle of cinnamon or a drizzle of light maple syrup.
Storage: Store leftovers in an airtight container in the refrigerator for up to 3 days. Reheat gently in the microwave or oven before serving to restore its warmth and texture.
Freezing: For longer storage, you can freeze individual portions. Wrap each portion tightly in plastic wrap and foil before freezing. To reheat, thaw overnight in the refrigerator and warm in the microwave or oven.
Conclusion:

This Weight Watchers-Friendly Cinnamon Apple Bake is a delightful and healthier twist on a classic dessert. With reduced fat and sugar, this recipe fits seamlessly into your Weight Watchers plan while still offering the comforting, indulgent flavors you love. Whether you’re serving it for breakfast, brunch, or as a sweet treat, this dish is sure to be a hit with family and friends. Enjoy the perfect blend of cinnamon, apple, and nuts, all while staying on track with your health goals.

Light, fruity, creamy — and low in points!
✅ Simple Ingredients (Makes 8 Servings)

  • 1 box (1 oz) sugar-free vanilla instant pudding mix
    (Use JELL-O Sugar-Free, Fat-Free if possible – 0 Points)
  • 2 cups cold skim milk
    (Or unsweetened almond milk if your plan allows – 2 Points total)
  • 1 tub (8 oz) fat-free whipped topping
    (Like Cool Whip Free, thawed – 1 Point total)
  • 24 reduced-fat Nilla wafers
    (That’s 3 per serving – 3 Points)
  • 2 ripe bananas, sliced
    (0 Points – naturally sweet and filling)
  • 1 cup fresh strawberries, chopped
    (Or use no sugar added pie filling – 0 Points)

🧊 Pro Tip: Chill it for at least 2 hours before serving for best flavor and texture!

🥣 Instructions

  1. Prepare pudding:
    In a bowl, whisk sugar-free pudding mix with 2 cups of skim milk until it thickens (about 2 minutes).
  2. Fold in topping:
    Gently fold in the fat-free whipped topping until smooth and creamy.
  3. Layer it up:
    In a medium dish or individual jars:
    ➤ Layer a few Nilla wafers on the bottom
    ➤ Add banana slices
    ➤ Spoon on pudding mixture
    ➤ Add a layer of strawberries
    ➤ Repeat once or twice
  4. Top it off:
    Add a few extra wafers or sliced bananas/strawberries on top for garnish.
  5. Chill:
    Refrigerate for at least 2 hours before serving to let the flavors blend and wafers soften.

👩‍🍳 Tips:

Freeze a batch for a chilled summer treat!

Want to make it even lighter? Swap wafers with a crushed light graham cracker for fewer points.

Use individual clear jars or cups for portion control and presentation.
🔹 Estimated WW SmartPoints: 6 points per serving
(May vary slightly depending on specific brands used and WW plan version)