Author

Chloe Harper

Browsing

Keto Pesto Pasta Bake
Ingredients:

  • 16 oz shirataki noodles (or another low-carb pasta substitute), cooked and drained
  • 2 cups chicken, cooked and shredded
  • 2 (6 oz) jars pesto (ensure it’s a low-carb version or homemade with minimal carbs)
  • 1 (14 oz) jar diced tomatoes, drained (or use fresh tomatoes with lower carb content)
  • 16 oz fresh spinach (instead of frozen, as fresh has fewer carbs)
  • ⅓ cup olive oil
  • 3 tablespoons lemon juice
  • 2 cups shredded mozzarella cheese, divided
  • 1-2 teaspoons red pepper flakes
  • 1 teaspoon salt
  • 1 teaspoon black pepper
  • ½ cup shredded parmesan cheese

Free Keto Meal Plan : KETO DIET PLAN FOR BEGINNERS STEP BY STEP GUIDE

Preparation:

  1. Preheat Oven:
    • Preheat your oven to 400°F (200°C) and grease a 9×13-inch baking dish.
  2. Prepare the Mixture:
    • In a large bowl, combine the cooked shirataki noodles (or other low-carb pasta), shredded chicken, pesto, drained tomatoes, spinach, olive oil, lemon juice, 1 ½ cups of mozzarella, red pepper flakes, salt, and pepper. Stir until well mixed.
  3. Transfer to Baking Dish:
    • Transfer the mixture to the prepared baking dish and sprinkle the remaining ½ cup mozzarella and parmesan cheese on top.
  4. Bake:
    • Bake in the preheated oven for 35-40 minutes, or until the dish is bubbling and the cheese is melted and slightly golden.

Free Keto Meal Plan : KETO DIET PLAN FOR BEGINNERS STEP BY STEP GUIDE

Nutritional Information (per serving, assuming 8 servings):

  • Calories: ~350
  • Fat: ~28g
  • Protein: ~20g
  • Carbs: ~7g
    • Fiber: ~3g
    • Net Carbs: ~4g

Tips:

  • Low-Carb Pasta: Shirataki noodles or zoodles (zucchini noodles) are great options for keeping this dish low in carbs.
  • Pesto: Use a homemade or store-bought pesto with minimal added sugars or carbs to ensure it fits within keto guidelines.
  • Cheese: For extra flavor, consider mixing in some gouda or provolone with the mozzarella.
  • Veggies: Feel free to add other low-carb veggies like mushrooms or bell peppers for added texture and flavor.

Free Keto Meal Plan : KETO DIET PLAN FOR BEGINNERS STEP BY STEP GUIDE

This keto version of Pesto Pasta Bake is perfect for those looking to enjoy a comforting pasta dish without the extra carbs!

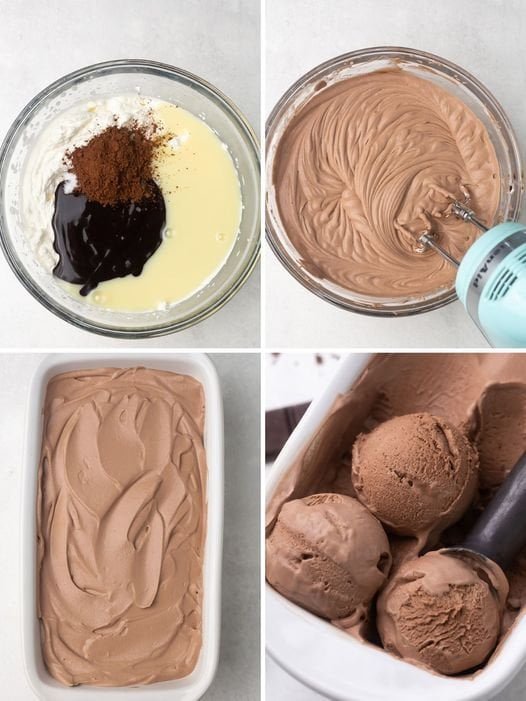
Keto No Churn Chocolate Ice Cream
Ingredients:

  • 2 cups heavy whipping cream
  • 1 cup unsweetened almond milk (or other low-carb milk substitute)
  • 1/2 cup powdered erythritol sweetener (or to taste)
  • 1/4 cup sugar-free chocolate syrup
  • 2 tablespoons unsweetened cocoa powder
  • 1 tablespoon vanilla extract
  • A pinch of salt (optional)

Free Keto Meal Plan : KETO DIET PLAN FOR BEGINNERS STEP BY STEP GUIDE

Instructions:

  1. Whip the Cream:
    • In a large mixing bowl, use an electric mixer to beat the heavy whipping cream on medium speed until stiff peaks form.
  2. Combine Ingredients:
    • In a separate bowl, mix together the almond milk, powdered erythritol, sugar-free chocolate syrup, cocoa powder, vanilla extract, and salt (if using) until smooth.
  3. Fold Mixtures:
    • Gently fold the chocolate mixture into the whipped cream using a spatula. Be careful not to deflate the whipped cream too much.
  4. Freeze:
    • Spread the mixture into a loaf pan or a 2-quart baking dish. Freeze until firm, which usually takes about 4-6 hours or overnight.
  5. Serve:
    • Allow the ice cream to sit at room temperature for 15-20 minutes before serving for the best texture.

Free Keto Meal Plan : KETO DIET PLAN FOR BEGINNERS STEP BY STEP GUIDE

Nutritional Information (per serving, assuming 8 servings):

  • Calories: ~250
  • Fat: ~22g
  • Protein: ~3g
  • Carbs: ~5g
    • Fiber: ~2g
    • Net Carbs: ~3g

Tips:

  • Sweetener: Adjust the erythritol to your taste preference. You can also use other keto-friendly sweeteners like monk fruit or stevia if preferred.
  • Chocolate Syrup: Ensure the chocolate syrup you use is sugar-free to keep it low-carb.
  • Texture: For an extra smooth texture, blend the ingredients before folding them into the whipped cream.

Free Keto Meal Plan : KETO DIET PLAN FOR BEGINNERS STEP BY STEP GUIDE

Enjoy this rich and creamy keto chocolate ice cream as a satisfying low-carb dessert!

Lemon Garlic Lobster Tails
Ingredients:

  • 4 lobster tails (5 to 6 oz each)
  • 1 tablespoon fresh parsley, very finely chopped (plus more for garnish)
  • 2 garlic cloves, pressed
  • 1 teaspoon Dijon mustard
  • 1/4 teaspoon salt
  • 1/8 teaspoon black pepper
  • 1 1/2 tablespoons olive oil
  • 1 1/2 tablespoons fresh lemon juice
  • 4 tablespoons unsalted butter, divided

Instructions:

  1. Prepare Lobster Tails:
    • Preheat your oven to 425°F (220°C).
    • Using kitchen shears, cut the top shell of each lobster tail down the middle, lengthwise. Gently pull apart the shell to expose the meat. Use your fingers to lift the lobster meat out of the shell, keeping it attached at the base. Place the meat on top of the shell.
  2. Make Lemon Garlic Sauce:
    • In a small bowl, mix together the pressed garlic, Dijon mustard, salt, black pepper, olive oil, lemon juice, and finely chopped parsley.
  3. Apply the Sauce:
    • Brush or spoon the lemon garlic sauce evenly over the lobster meat.
  4. Add Butter:
    • Melt 2 tablespoons of the unsalted butter and drizzle it over the lobster meat. Reserve the remaining 2 tablespoons of butter for later.
  5. Bake Lobster:
    • Place the lobster tails on a baking sheet or in a baking dish. Bake in the preheated oven for 10-12 minutes, or until the lobster meat is opaque and cooked through. The internal temperature should reach 140°F (60°C).
  6. Finishing Touch:
    • While the lobster tails are baking, melt the remaining 2 tablespoons of butter. After removing the lobster from the oven, brush the melted butter over the cooked lobster meat.
  7. Garnish and Serve:
    • Garnish with additional chopped parsley and serve immediately.

Nutritional Information (per serving, assuming 4 servings):

  • Calories: ~280
  • Fat: ~22g
  • Protein: ~22g
  • Carbs: ~1g

Tips:

Garnish: Fresh lemon wedges can be served on the side for an extra citrusy touch.

Checking Doneness: The lobster meat should be opaque and slightly firm to the touch. Avoid overcooking as it can become tough.

Butter Substitute: If you prefer, you can use ghee or another fat in place of the butter for a slightly different flavor.

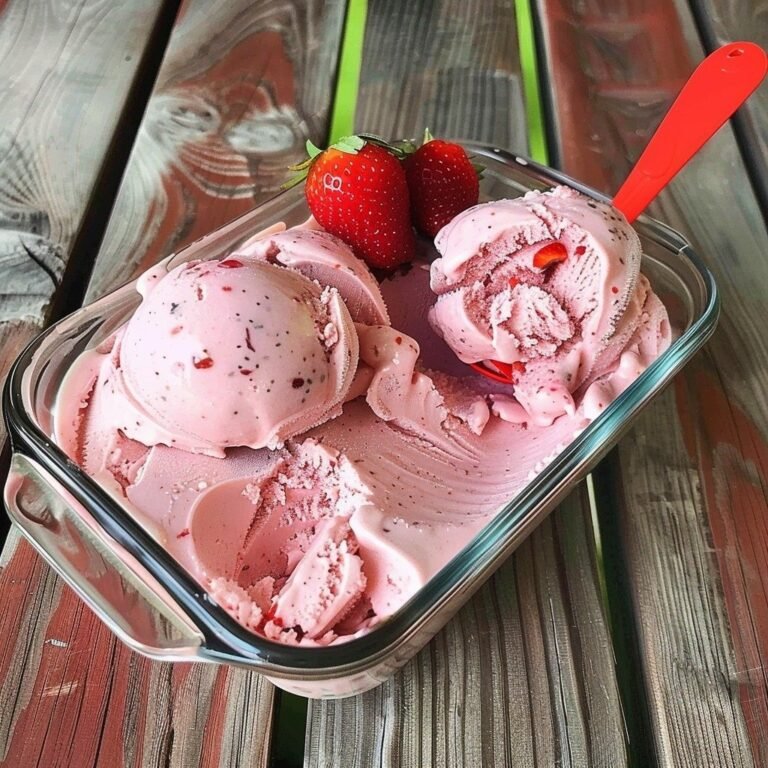
Keto-Friendly “Ice Cream”: A Delicious Low-Carb Treat

Introduction

Welcome to a delightful and refreshing twist on your favorite frozen treat with our Keto-Friendly “Ice Cream” recipe! This low-carb version of the traditional fruit-based ice cream is tailored for those following a ketogenic diet, offering a satisfying, creamy dessert without the carbs. Perfect for anyone who loves a good ice cream but wants to stay on track with their keto lifestyle, this recipe allows you to enjoy a decadent, guilt-free treat that fits within your dietary goals. With a blend of wholesome ingredients and easy preparation, this recipe will soon become a staple in your keto dessert repertoire.

Ingredients

  • 2 cups frozen strawberries: Use unsweetened, frozen strawberries for a low-carb, keto-friendly base. Frozen berries provide the texture needed for a creamy consistency while keeping the carb count in check.
  • 1 cup unsweetened almond milk: Acts as a low-carb liquid base, offering a creamy texture without adding extra carbs. You can also use other unsweetened nut milks such as coconut milk or cashew milk.
  • 1/4 cup heavy cream: Adds richness and creaminess to the mixture, enhancing the texture of your ice cream. Heavy cream is low in carbs and provides the desired creamy consistency.
  • 1-2 tablespoons erythritol or monk fruit sweetener: These keto-friendly sweeteners provide the necessary sweetness without adding carbs. Adjust according to your taste preferences.
  • 1 teaspoon vanilla extract: Enhances the overall flavor of the ice cream, adding a touch of vanilla without any added carbs.
  • Optional Add-ins: 1/4 cup crushed nuts, dark chocolate chips (sugar-free), or a sprinkle of cinnamon for extra flavor and texture.

Instructions

  1. Prepare the Ingredients: Begin by ensuring that your strawberries are fully frozen. For best results, freeze fresh strawberries for at least 4 hours or overnight. If using pre-frozen strawberries, check that they are unsweetened to keep the carb count low.
  2. Combine Ingredients: In a high-powered blender or food processor, combine the frozen strawberries, unsweetened almond milk, and heavy cream. Blend until the mixture is smooth and creamy. If the blender is having trouble, you can add a little more almond milk to help it blend more easily.
  3. Sweeten the Mixture: Add 1-2 tablespoons of erythritol or monk fruit sweetener to the blender. Blend again until the sweetener is fully dissolved and incorporated into the mixture. Taste and adjust sweetness if necessary.
  4. Add Vanilla Extract: Add 1 teaspoon of vanilla extract to the mixture. Blend once more to evenly distribute the vanilla flavor throughout the ice cream.
  5. Check Consistency: The mixture should have a soft-serve consistency. If it’s too thick, add a small amount of additional almond milk, 1 tablespoon at a time, until the desired consistency is achieved. If it’s too thin, you can add a few more frozen strawberries to thicken it up.
  6. Optional Add-ins: If desired, gently fold in optional add-ins such as crushed nuts, sugar-free dark chocolate chips, or a sprinkle of cinnamon. These add-ins can enhance the flavor and texture of your keto ice cream.
  7. Freeze (Optional): If you prefer a firmer texture, transfer the mixture to an airtight container and freeze for about 1-2 hours. This will help the ice cream become more solid and scoopable.
  8. Serve: Scoop the keto-friendly “ice cream” into bowls or cones. Enjoy immediately for a soft-serve texture, or allow it to sit at room temperature for a few minutes if it has been frozen for a firmer consistency.
  9. Store Leftovers: Store any leftover ice cream in an airtight container in the freezer. To serve leftovers, let them thaw slightly at room temperature for 5-10 minutes to soften before scooping.

Nutritional Information

  • Serving Size: 1/2 cup
  • Calories: 150
  • Total Fat: 12 grams
  • Saturated Fat: 6 grams
  • Cholesterol: 40 mg
  • Sodium: 10 mg
  • Total Carbohydrates: 7 grams
  • Dietary Fiber: 4 grams
  • Net Carbs: 3 grams
  • Protein: 2 grams

SmartPoints (Weight Watchers)

  • SmartPoints: 4 (per 1/2 cup serving)

Additional Tips and Information

  • Ingredient Substitutions: You can customize the ice cream with different types of low-carb berries such as blueberries or raspberries. Adjust the amount of sweetener based on the type and ripeness of the fruit.
  • Texture Adjustments: For a creamier texture, you can increase the amount of heavy cream or add a small amount of xanthan gum. This helps to improve the texture and prevent ice crystals from forming.
  • Blender Tips: If your blender struggles with the frozen strawberries, let them thaw slightly before blending or use a high-powered blender that can handle frozen ingredients.
  • Health Benefits: This keto-friendly “ice cream” is low in carbs and high in healthy fats from the heavy cream, making it a great option for those on a ketogenic diet. The strawberries provide antioxidants and vitamins while keeping the dessert delicious and refreshing.
  • Serving Suggestions: This keto ice cream can be enjoyed on its own or topped with a variety of keto-friendly toppings such as whipped cream, fresh berries, or a drizzle of sugar-free chocolate sauce.
  • Dietary Considerations: This recipe is designed to fit within a ketogenic diet, providing a low-carb and satisfying dessert option. It’s suitable for those looking to enjoy a sweet treat without compromising their dietary goals.
  • Customization Options: Experiment with different flavor variations by adding extracts such as almond or peppermint. You can also blend in a small amount of unsweetened cocoa powder for a chocolate version or add a swirl of sugar-free peanut butter for extra richness.
  • Serving Size Management: While this recipe is low in carbs, portion control is still important. Stick to the recommended serving size to stay within your daily carb limit and maintain your keto diet effectively.

This Keto-Friendly “Ice Cream” recipe offers a delicious and satisfying way to enjoy a sweet treat while sticking to your ketogenic lifestyle. With its creamy texture and customizable flavors, it’s a perfect addition to your low-carb dessert collection. Enjoy this refreshing treat as part of your balanced diet and relish the taste of indulgence without the carbs.

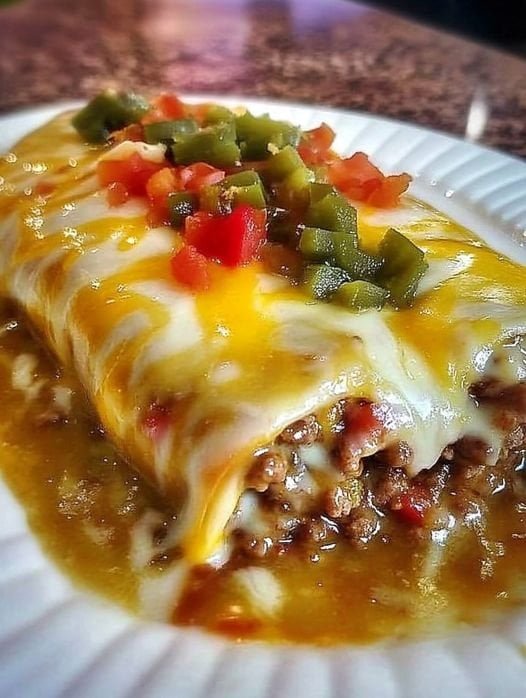
Wet Burritos ( Low-Carb, Sugar-Free!) are filled with cheese and cooked beef mixture. It gives you a flavorful taste and is topped with sauce and more cheese and it is the best meal to be enjoyed in dinner as well Wet Burritos ( Low-Carb, Sugar-Free!)

Ingredients:
6 Low carb tortillas
Ground beef 2 lb
Mineral salt 1 tsp.
Chili powder 1 tsp.
Chopped garlic 1 tsp.
Cumin 1 tsp.
Shredded Mexican cheese 1 cup
Sauce:
Block cream cheese 18 oz.
Chicken broth 1/4 cup
Tomato sauce 1/2 cup
Chili powder 1 tsp.

Paprika 1/2 tsp.
Cumin 1 tsp.
Chopped garlic 1 tsp.
1 small onion
Instructions:
Sauce:
Put all the sauce’s ingredients into the mixer or blender to make a smooth paste.
Burritos:
Take a pan and spray it with cooking oil and add the minced beef and cook until golden brown.
After the beef is cooked, drain and rinse and add it back to the pan and add the chili powder, salt, cumin and chopped garlic and mix it well.
Take a 9×13 inches nonstick pan and spray with cooking oil.
Now use tortilla and use good amount of beef mixture and cheese in each tortilla and wrap it to the burrito shape.
Place the roll into the pan and top it with the sauce and add more cheese over it.
Bake it for atleast 15 minutes on 350 degrees until the cheese is melt properly.
Wet burrito is ready to enjoy in meal.
Nutritional facts:
Calories 390
Total Fat 19.7g
Cholesterol 136mg
Sodium 453mg
Total Carbohydrates 11.1g
Protein 39.9g

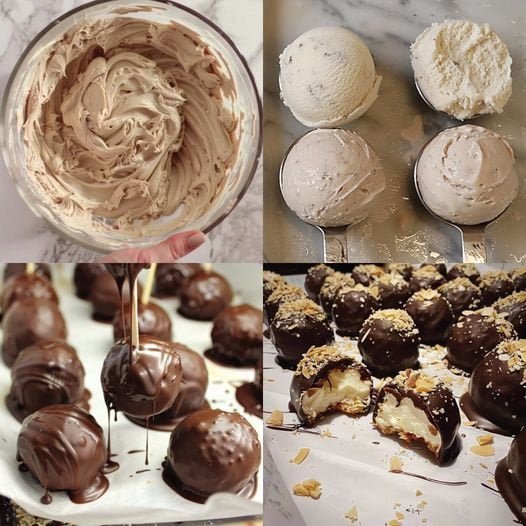
The Keto Almond Joy Cream Truffles are a delicious recipe. Furthermore, the chocolate coconut and the yummy low-carbohydrate ball are flavorful. A delightful sugar-free dessert. Additionally, it is free of gluten.

What’s special about this recipe?
These truffles made with keto cream taste the same as balls of candy. These desserts are bite-sized and combine tastes of chocolate, coconut, and almonds. Furthermore, these truffle balls allow you to manage portion sizes, however, it’s difficult to stop at just two. Almond and chocolate cream truffles covered in melted chocolate with a hint of coconut flavor are known as low-carb almond joy truffles. And added crushed coconut flakes on top.
Ingredients:
Almond extract: 1 tsp.
Butter: 1 tsp
Powder erythritol: 1/4 cup.
Coconut extract: 1/2 tsp.
Heavy whipping cream: 1/2 cup.
Unsweetened coconut: 1/2 cup.
Instructions:
Put a half-cup of keto chocolate chips in a small dish that is safe for microwaves.
In the microwave, melt the cacao in 30-second increments, stirring in between.
Using an electric mixer, combine the heavy whipping cream, then add the chocolate to it and mix it.
Beat while peaks become firm.
Scoop smaller balls of the thick chocolate mixture with a cookie scoop or tablespoon and place them half an inch to one inch apart on a baking pan covered with a paper towel.
Freeze for one hour, up to the point where the mixture solidifies.
In a microwave safe container, melt the remaining one-quarter cup of keto-approved chocolate chips and butter at intervals of thirty seconds, stirring in between.

Stir in the cocoa extract.
Using a dental pick or fork, dip every cacao chocolate into the melted chocolate.
Go back to baking with paper towels and attempt to set.
Put the chopped coconut on top right away.
Storage information:
You may store these keto cream truffles for a few hours at room temperature. If you want to keep them from getting too mushy or spoiling, you ought to put them in the freezer.
Nutritional:
Total carbs: 4.1 g.

Fat: 9.8 g.

Calories: 91 kcal.

Protein: 0.1 g

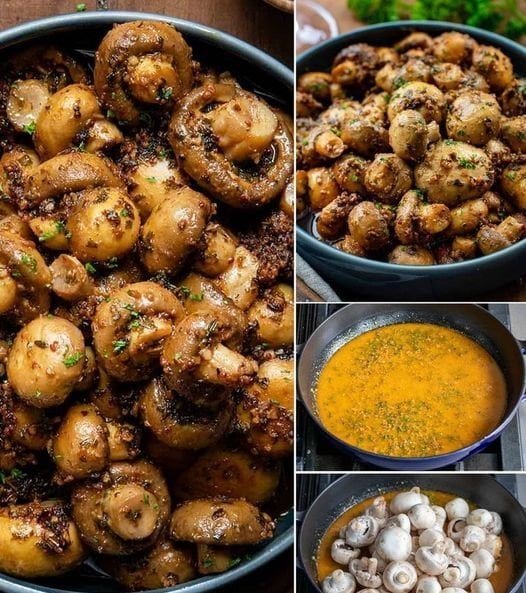
Cowboy Mushrooms

Free Keto Meal Plan : KETO DIET PLAN FOR BEGINNERS STEP BY STEP GUIDE
Ingredients:

  • 2 pounds white button mushrooms, cleaned
  • Cowboy Butter (doubled):
    • 1 cup unsalted butter, softened
    • 1 tablespoon lemon juice
    • 1 tablespoon Dijon mustard
    • 1 tablespoon minced garlic
    • 1 tablespoon chopped fresh parsley
    • 1 teaspoon chopped fresh chives
    • 1 teaspoon chopped fresh rosemary
    • 1 teaspoon chopped fresh thyme
    • 1 teaspoon red pepper flakes (optional)
    • 1/2 teaspoon paprika
    • 1/2 teaspoon salt
    • 1/4 teaspoon black pepper
  • Salt, to taste

Free Keto Meal Plan : KETO DIET PLAN FOR BEGINNERS STEP BY STEP GUIDE

Instructions:

  1. Prepare the Cowboy Butter:
    • In a medium bowl, combine the softened butter with lemon juice, Dijon mustard, minced garlic, parsley, chives, rosemary, thyme, red pepper flakes (if using), paprika, salt, and black pepper. Mix well until all ingredients are fully incorporated.
  2. Cook the Mushrooms:
    • In a large skillet over medium heat, add the cowboy butter. Allow the butter to melt and become fragrant.
    • Add the cleaned mushrooms to the skillet. Stir to coat the mushrooms evenly with the butter mixture.
    • Cook, stirring occasionally, for about 20-22 minutes, or until the mushrooms are tender and have a nice golden color.
  3. Serve:
    • Serve the Cowboy Mushrooms hot as a side dish or appetizer.
    • These mushrooms are also perfect for topping a steak or grilled meat.

Nutrition Information (per serving, based on 6 servings):

  • Calories: ~280 kcal
  • Fat: ~28g
  • Carbs: ~4g net carbs
  • Protein: ~4g

Free Keto Meal Plan : KETO DIET PLAN FOR BEGINNERS STEP BY STEP GUIDE

Tips:

  • Mushrooms: Make sure the mushrooms are thoroughly cleaned before cooking. You can also use a mix of mushrooms for a more complex flavor.
  • Butter: Cowboy Butter can be made ahead of time and stored in the fridge for up to a week. It’s also great for basting meats or spreading on vegetables.
  • Serving: Serve these mushrooms alongside a keto-friendly steak or grilled chicken for a complete meal.

These Keto Cowboy Mushrooms are a rich, flavorful side dish that will add a delicious depth to any meal. Enjoy!

Keto Creamy Crab and Shrimp Seafood Bisque
Ingredients:

For the Seafood Bisque:

  • 1/2 pound shrimp, peeled and deveined
  • 1/2 pound crab meat, preferably lump
  • 2 tablespoons butter
  • 1 onion, finely chopped
  • 1 carrot, finely diced (optional, can reduce or omit for lower carbs)
  • 2 stalks celery, finely diced
  • 3 cloves garlic, minced
  • 1/4 cup tomato paste (sugar-free)
  • 3 cups seafood or fish broth
  • 1 cup heavy cream
  • 1 teaspoon paprika
  • 1 teaspoon dried thyme
  • Salt and pepper to taste
  • Fresh parsley, chopped, for garnish

Free Keto Meal Plan : KETO DIET PLAN FOR BEGINNERS STEP BY STEP GUIDE

For Thickening:

  • 1 teaspoon xanthan gum (instead of all-purpose flour)

Free Keto Meal Plan : KETO DIET PLAN FOR BEGINNERS STEP BY STEP GUIDE

Instructions:

1. Prepare the Seafood:

  • Cook the shrimp in a pot of boiling water for 2-3 minutes until they are pink and opaque. Remove, cool, and chop roughly. Set aside.

2. Sauté Vegetables:

  • In a large pot, melt butter over medium heat. Add the onion, celery, and garlic (omit or reduce carrot for lower carbs). Cook until the vegetables are softened, about 5-7 minutes.

3. Add Flavor Base:

  • Stir in tomato paste, paprika, and thyme. Cook for another 2 minutes.

4. Make the Bisque:

  • Sprinkle xanthan gum over the vegetables and stir to combine. Gradually add seafood broth, stirring continuously to prevent lumps.
  • Bring the mixture to a simmer, then reduce heat and let simmer gently for 20 minutes.

5. Add Seafood and Cream:

  • Add the chopped shrimp and crab meat to the pot. Pour in the heavy cream and stir to combine.
  • Cook for an additional 5 minutes, or until everything is heated through. Adjust seasoning with salt and pepper.

6. Serve:

  • Ladle the bisque into bowls and garnish with chopped parsley.

Nutrition Information (per serving, based on 6 servings):

  • Calories: ~300 kcal
  • Fat: ~24g
  • Carbs: ~6g net carbs (can be reduced further by omitting the carrot)
  • Protein: ~18g

Free Keto Meal Plan : KETO DIET PLAN FOR BEGINNERS STEP BY STEP GUIDE

Tips:

  • Carrot Omission: For stricter keto, you can omit the carrot entirely or reduce the quantity to lower the carb count further.
  • Xanthan Gum: This is a low-carb thickener that mimics the thickening properties of flour. Use sparingly to avoid a gummy texture.
  • Seafood: Use fresh, high-quality seafood for the best flavor. You can also add a splash of white wine for extra depth.
  • Serving: Serve with a side of keto-friendly bread or a simple green salad.

This keto version of Creamy Crab and Shrimp Seafood Bisque offers the same rich flavors and creamy texture with fewer carbs. Enjoy!

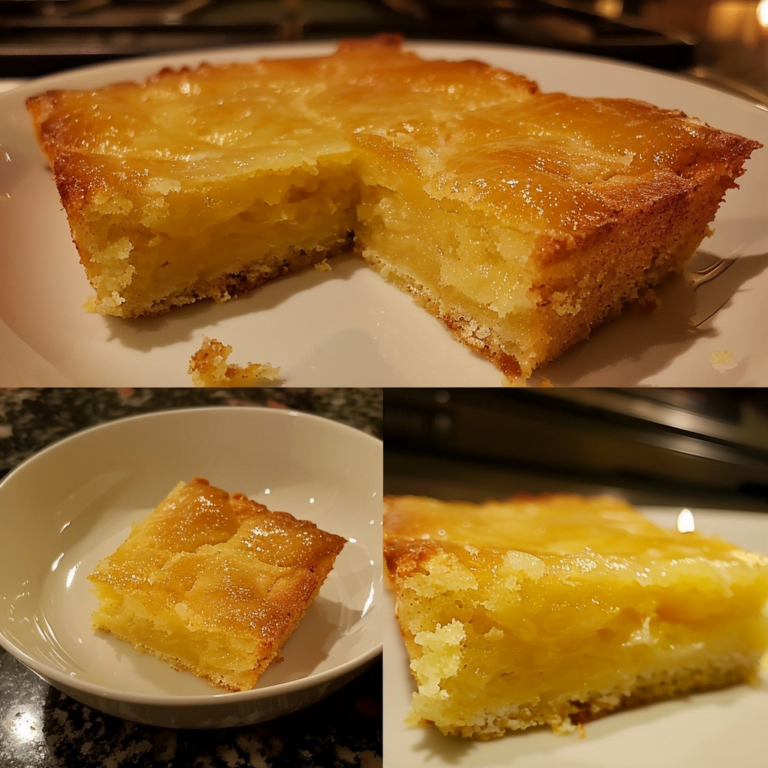
Keto Gooey Butter Cake: A Decadent Low-Carb Delight

Introduction

Welcome to the indulgent yet low-carb world of Keto Gooey Butter Cake! This recipe brings you a delightful twist on the classic gooey butter cake, tailored specifically for those adhering to a ketogenic diet. Known for its rich, creamy texture and irresistible flavor, this keto-friendly version maintains the same luxuriousness while keeping the carbohydrate count low. Ideal for special occasions, or simply to satisfy your sweet tooth, this cake is a perfect blend of decadence and dietary discipline.

Ingredients

For the Crust:

  • 2 cups almond flour: Provides a nutty base for the crust and keeps the recipe low in carbs. Opt for finely ground almond flour for the best texture.
  • 1/4 cup granulated erythritol: A keto-friendly sweetener that adds sweetness without carbs. You can also use monk fruit sweetener or stevia as alternatives.
  • 1/2 teaspoon baking powder: Helps to give a little lift to the crust.
  • 1/4 teaspoon salt: Enhances the flavors and balances the sweetness.
  • 1/4 cup unsalted butter: Melted and cooled. Adds richness and helps bind the crust together.
  • 1 large egg: Provides structure and helps the crust hold together.

For the Filling:

  • 8 ounces cream cheese: Softened. Provides a rich, creamy texture and base for the gooey filling.
  • 1 cup granulated erythritol: For sweetness. Ensure it is fully dissolved in the filling mixture.
  • 1/4 cup unsalted butter: Melted. Adds a buttery richness to the filling.
  • 2 large eggs: Room temperature. Helps to set the filling and give it a smooth texture.
  • 1 teaspoon vanilla extract: Adds depth of flavor to the filling.
  • 1/4 cup almond flour: Used in the filling to thicken and provide structure.
  • 1/4 cup coconut flour: Enhances the texture and helps absorb excess moisture.
  • 1/4 teaspoon salt: Balances the sweetness and enhances the overall flavor.
  • 1/4 teaspoon baking powder: Ensures the filling rises slightly and remains gooey.

Instructions

  1. Preheat the Oven: Begin by preheating your oven to 350°F (175°C). Prepare an 8×8-inch baking pan by greasing it with butter or lining it with parchment paper for easy removal.
  2. Prepare the Crust: In a medium mixing bowl, combine the almond flour, granulated erythritol, baking powder, and salt. Mix well to ensure even distribution.
  3. Add Wet Ingredients: Stir in the melted butter and the egg until the mixture comes together and forms a dough-like consistency. The dough should be moist and pliable.
  4. Press the Crust: Press the crust mixture evenly into the bottom of the prepared baking pan. Use your fingers or the back of a spoon to spread it out and create an even layer. This will form the base of your cake.
  5. Bake the Crust: Place the pan in the preheated oven and bake for 10-12 minutes, or until the crust is golden and slightly firm to the touch. Remove from the oven and let it cool slightly while you prepare the filling.
  6. Prepare the Filling: In a large mixing bowl, beat the softened cream cheese until smooth and creamy. This can be done using an electric mixer or a stand mixer fitted with a paddle attachment.
  7. Incorporate Sweetener and Butter: Gradually add the granulated erythritol to the cream cheese, mixing well to combine. Stir in the melted butter until fully incorporated.
  8. Add Eggs and Vanilla: Add the eggs one at a time, beating well after each addition to ensure a smooth and homogeneous mixture. Stir in the vanilla extract.
  9. Combine Dry Ingredients: In a separate bowl, sift together the almond flour, coconut flour, salt, and baking powder. This helps to avoid clumps and ensures an even distribution throughout the filling.
  10. Mix Dry and Wet Ingredients: Gradually add the dry ingredients to the cream cheese mixture, mixing until fully combined. The filling should be smooth and slightly thick.
  11. Assemble the Cake: Pour the prepared filling over the partially baked crust, spreading it evenly with a spatula.
  12. Bake the Cake: Return the pan to the oven and bake for 30-35 minutes, or until the filling is set and the top is lightly golden. The center should remain slightly gooey and jiggly when the pan is gently shaken.
  13. Cool the Cake: Allow the cake to cool in the pan on a wire rack for at least 1 hour before cutting into squares. This cooling period helps the cake to set properly and enhances the gooey texture.
  14. Serve: Cut the cooled cake into squares and serve. This cake can be enjoyed on its own or with a dollop of whipped cream or a sprinkle of powdered erythritol for extra sweetness.

Nutritional Information

  • Serving Size: 1 square (1/16 of the cake)
  • Calories: 250
  • Total Fat: 22 grams
  • Saturated Fat: 10 grams
  • Cholesterol: 95 mg
  • Sodium: 160 mg
  • Total Carbohydrates: 14 grams
  • Dietary Fiber: 4 grams
  • Net Carbs: 10 grams
  • Protein: 6 grams

SmartPoints (Weight Watchers)

  • SmartPoints: 8 (per serving)

Additional Tips and Information

  • Ingredient Substitutions: If you prefer, you can use other keto-friendly sweeteners such as monk fruit sweetener or stevia. Just ensure that the substitute has a similar sweetness level to erythritol.
  • Baking Tips: For the best results, make sure your cream cheese is fully softened before mixing. This helps to achieve a smooth filling. Also, check the cake towards the end of baking to avoid overcooking, which can affect the gooey texture.
  • Storage: Store any leftover Keto Gooey Butter Cake in an airtight container in the refrigerator for up to 1 week. The cake can also be frozen for up to 3 months. To freeze, wrap individual squares in plastic wrap and place them in a freezer-safe container.
  • Serving Suggestions: This cake pairs wonderfully with a cup of coffee or tea. For added flair, consider serving it with a dollop of keto-friendly whipped cream or a few fresh berries on the side.
  • Health Benefits: This Keto Gooey Butter Cake provides healthy fats from almond flour and butter, along with protein from the eggs and cream cheese. It’s a satisfying treat that fits well within a ketogenic diet while providing essential nutrients and a satisfying dessert experience.
  • Dietary Considerations: Ensure that all ingredients used are in line with your dietary goals. If you need to reduce fat further, consider using lower-fat cream cheese or butter, but be mindful that this may alter the texture slightly.
  • Customization Options: Feel free to customize the cake by adding a few sugar-free chocolate chips to the filling or incorporating a swirl of unsweetened cocoa powder for a chocolate version. You can also experiment with flavor extracts such as almond or lemon to add a unique twist.

Enjoy this Keto Gooey Butter Cake as a delightful and decadent treat that supports your ketogenic lifestyle. With its rich flavor and gooey texture, it’s a delicious way to enjoy a classic dessert while staying on track with your low-carb diet.

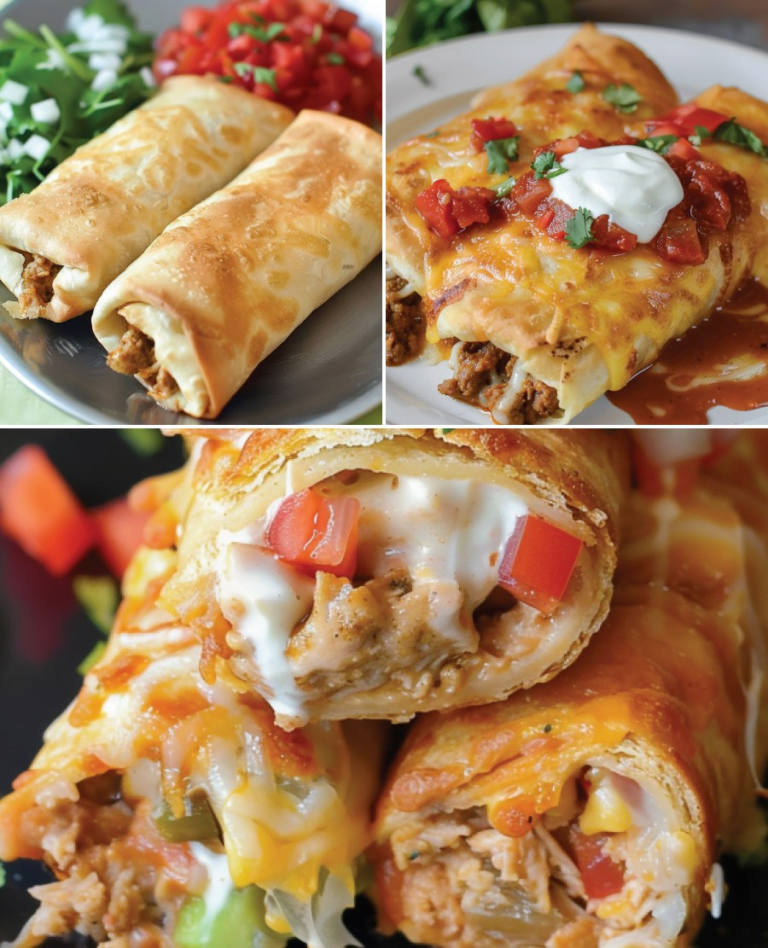
Keto Mexican Chimichangas: A Flavorful Low-Carb Delight

Introduction

Welcome to an exciting twist on a classic favorite with our Keto Mexican Chimichangas recipe! This low-carb, keto-friendly version of the traditional Mexican chimichanga retains all the delicious, savory flavors of the original while adhering to your ketogenic diet. Crispy on the outside and filled with a flavorful mixture of seasoned meat and cheese, these chimichangas make a perfect meal for anyone looking to enjoy Mexican cuisine without the carbs. This detailed recipe will guide you through each step, ensuring you achieve a perfect result every time.

Ingredients

For the Tortilla Wraps:

  • 2 cups almond flour: Provides a low-carb, nutty base for the tortillas. Ensure you use finely ground almond flour for the best texture.
  • 2 large eggs: Room temperature. Helps to bind the dough and provide structure.
  • 1/2 cup shredded mozzarella cheese: Adds elasticity and helps to hold the tortillas together.
  • 1/4 cup coconut flour: Provides additional structure and absorbs excess moisture.
  • 1/2 teaspoon baking powder: Helps the tortillas to rise slightly and become more pliable.
  • 1/4 teaspoon salt: Enhances the flavor of the tortillas.
  • 1/4 cup water: Adjust as needed to achieve the right dough consistency.

For the Filling:

  • 1 pound ground beef: Use lean ground beef to reduce fat content. You can also substitute with ground turkey or chicken if preferred.
  • 1 tablespoon olive oil: For cooking the beef and adding flavor.
  • 1 small onion: Finely chopped. Adds sweetness and depth to the filling.
  • 2 cloves garlic: Minced. Provides a robust flavor.
  • 1 tablespoon chili powder: Adds a rich, spicy flavor.
  • 1 teaspoon ground cumin: Enhances the savory flavor of the filling.
  • 1 teaspoon paprika: Adds a subtle smokiness.
  • 1/2 teaspoon dried oregano: Contributes an earthy aroma.
  • 1/4 teaspoon cayenne pepper: Optional, for added heat.
  • 1/2 cup shredded cheddar cheese: Adds a cheesy richness to the filling.
  • 1/2 cup salsa: Choose a low-sugar variety to keep the carb count low.
  • Salt and pepper to taste: For seasoning the filling.

For Frying:

  • 1 cup avocado oil: A healthier choice for frying, with a high smoke point.

Instructions

  1. Prepare the Tortilla Dough: In a large mixing bowl, combine the almond flour, coconut flour, baking powder, and salt. Mix well to ensure even distribution of the dry ingredients.
  2. Incorporate Wet Ingredients: In a separate bowl, whisk together the eggs and water. Gradually add the egg mixture to the dry ingredients, mixing until a dough forms. If the dough is too sticky, add a little more almond flour until it reaches the right consistency.
  3. Add Cheese: Stir in the shredded mozzarella cheese until fully incorporated into the dough. The cheese will help bind the dough and add a nice texture to the tortillas.
  4. Roll Out the Tortillas: Place the dough between two sheets of parchment paper and roll out to about 1/8-inch thickness. Cut the dough into 6-inch squares or circles, depending on your preference.
  5. Cook the Tortillas: Heat a non-stick skillet or griddle over medium heat. Cook each tortilla for about 1-2 minutes on each side, or until they are golden brown and slightly crispy. Set aside and keep warm.
  6. Prepare the Filling: In a large skillet, heat the olive oil over medium heat. Add the finely chopped onion and cook until softened and translucent, about 5 minutes.
  7. Cook the Beef: Add the minced garlic and ground beef to the skillet. Cook, breaking the meat apart with a spoon, until it is browned and fully cooked. Drain any excess fat.
  8. Season the Beef: Stir in the chili powder, ground cumin, paprika, dried oregano, and cayenne pepper (if using). Mix well to ensure the spices are evenly distributed. Cook for an additional 2 minutes to allow the flavors to meld together.
  9. Add Cheese and Salsa: Remove the skillet from heat and stir in the shredded cheddar cheese and salsa. Mix until the cheese is melted and the filling is well combined.
  10. Assemble the Chimichangas: Place a generous amount of the beef filling in the center of each tortilla. Fold the sides of the tortilla over the filling, then roll up tightly to form a burrito shape. Ensure the edges are sealed well to prevent the filling from leaking.
  11. Fry the Chimichangas: Heat the avocado oil in a deep skillet or frying pan over medium-high heat. Carefully place the chimichangas in the hot oil, seam side down, and fry for about 2-3 minutes on each side, or until they are golden brown and crispy. Avoid overcrowding the pan; fry in batches if necessary.
  12. Drain Excess Oil: Remove the fried chimichangas from the oil and place them on a paper towel-lined plate to drain any excess oil.
  13. Serve: Serve the chimichangas hot, garnished with your favorite toppings such as shredded lettuce, diced tomatoes, avocado slices, or a dollop of sour cream.

Nutritional Information

  • Serving Size: 1 chimichanga
  • Calories: 350
  • Total Fat: 28 grams
  • Saturated Fat: 8 grams
  • Cholesterol: 85 mg
  • Sodium: 600 mg
  • Total Carbohydrates: 15 grams
  • Dietary Fiber: 6 grams
  • Net Carbs: 9 grams
  • Protein: 20 grams

SmartPoints (Weight Watchers)

  • SmartPoints: 8 (per chimichanga)

Additional Tips and Information

  • Ingredient Substitutions: If you prefer, you can use ground chicken or turkey instead of beef for a leaner option. You can also use different types of cheese or adjust the spice levels to suit your taste preferences.
  • Tortilla Alternatives: For a softer, more pliable tortilla, you can experiment with adding a small amount of xanthan gum to the dough. This can improve the texture and elasticity of the tortilla.
  • Frying Tips: Ensure the oil is hot enough before adding the chimichangas to avoid sogginess. You can test the oil temperature by dropping a small piece of dough into the oil; it should sizzle and float to the surface.
  • Storage: Store leftover chimichangas in an airtight container in the refrigerator for up to 3 days. To reheat, place them in a hot oven or skillet to restore their crispiness. You can also freeze the assembled but uncooked chimichangas for up to 3 months. To cook from frozen, simply fry them directly from the freezer, adding a few extra minutes to the cooking time.
  • Health Benefits: This Keto Mexican Chimichangas recipe is low in carbs and high in protein, making it a great option for those following a ketogenic diet. The use of healthy fats from avocado oil and cheese contributes to a balanced macronutrient profile.
  • Serving Suggestions: These chimichangas are versatile and can be served with a variety of sides. Consider pairing them with a fresh salad, sautéed vegetables, or a side of cauliflower rice for a complete meal. For added flavor, top with salsa, guacamole, or a sprinkle of fresh cilantro.
  • Dietary Considerations: This recipe is designed to fit within a ketogenic diet and is suitable for those on a low-carb eating plan. Be mindful of portion sizes and adjust the amount of filling and oil used based on your specific dietary goals.
  • Customization: Feel free to customize your chimichangas by adding additional ingredients such as black olives, jalapeños, or sautéed peppers to the filling. These additions can enhance the flavor and texture of the dish while keeping it within keto guidelines.

This Keto Mexican Chimichangas recipe offers a delicious and satisfying way to enjoy a classic Mexican dish while adhering to your low-carb lifestyle. With its crispy exterior and flavorful filling, it’s a perfect meal for any occasion. Enjoy the rich flavors of Mexican cuisine without compromising your dietary goals.